
Vintage Modern Wicker Chair, before & after.
About two months ago, we were given this wonderful heirloom, a vintage wicker chair passed down from Matt’s Grandma Kitzinger. I’m not a big wicker person, but this particular chair was different. I love its substantial structure and shape. The cushion is really nice and large and quite comfy. I knew it had superstar refurbishing potential, so I set out to find the color of its future.
It couldn’t be just any color, though, and I knew because of the wicker surface (holy-moly!) brushes weren’t gonna cut it. Luckily, our friends at HomeRight came to the rescue! In fact, I have to give them the credit for introducing me to my new best DIY friend: the Finish Max Sprayer!
I must confess, because I’ve never-ever used an electric paint sprayer, I was (1) quite nervous I wouldn’t know how to work it right and ruin a family heirloom (sorry Grandma!), and (2) I was DREADING the blasted clean-up.
Well…my friends…I’m here to say that I was super-duper pleasantly surprised! I loved it! It was not only easy and fun to use, it left the most beautiful glaze of blue, looked like a professional furniture spray job, and, here it comes…the clean-up was almost easier than cleaning brushes! Go figure! Can you tell I’m excited about my new gadget?!?
I digress…
So, when it came to the chair’s paint color, I allowed the fabric to inspire me. I absolutely recommend finding the material you want when recovering a chair cushion, then pulling a color from the design. It’s so much easier this way, and you might surprise yourself with what hue you end up choosing. I was!
I love this shade of turquoise blue…it’s really quite modern and beachy. It also fits well with the shape and style of the chair and doesn’t overpower its delicacy.
My mother-in-law Roseann is coming to visit this weekend…I sure hope she approves. As for our new gem of a hand-me-down…thanks grandma!
Supplies:

For the cushion:
• 1/2 yard of outdoor fabric
• staple gun
• scissors
For the chair:
• 1 pint of paint (I used Behr’s “Lagoon”…the leftover paint will go to another project later!)
• HomeRight Finish Max Sprayer (available on HomeRight.com for $89.99, at Ace Hardware and online at amazon, Home Depot and Lowes)
• tarp, cardboard or a spray shelter for the small amount of overspray
Instructions:
Step #1: After removing the old fabric, I stapled on the new one. Note: if you start at the middle-front, you’ll have a good foundation for even stapling.

Stapling on the new fabric.
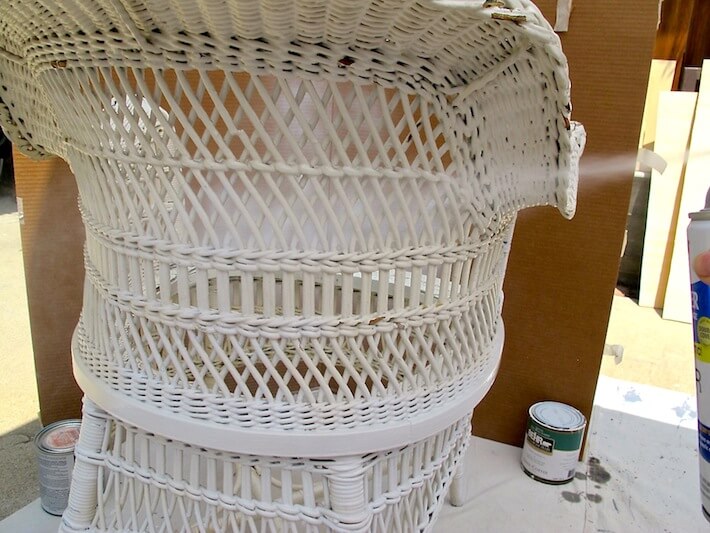
Step #2: I sprayed on a layer of primer to make sure this new paint would adhere properly.

Priming the wicker.
Step #3: I had to prep/thin the paint for the sprayer, so I used the viscosity cup to time how long the paint would drip out of the funnel. I was instantly intimidated, but hung in there…I added about a 1/2 cup of water, stirred it, and it worked perfectly. Easy-peasy.

Thinning the paint
See Also: How to Thin Enamel for the Finish Right Sprayer (VIDEO)
Step #4: I sprayed the chair…and it was so fun and easy! It took just one coat.

Painting with the HomeRight Finish Max Sprayer…my new DIY best friend!
…aaaaand…this is why I love this sprayer so much…it really gets into the nooks and crannies!

Easily paints the nooks and crannies
Step #5: the clean-up! Again, I was so happy to learn how easy this was. Note: I was definitely avoiding this part of the process, so I stalled for about 30 minutes before cleaning. It was still really easy, but some of the paint had started sticking to the sprayer. No worries! I simply used a toothpick to grab the drying paint (kinda like the consistency of drying Elmer’s glue).
Lesson learned: clean immediately! I also used a pliers to unscrew the brass fluid nozzle-its newness made it necessary to give it a little encouragement. For a video tutorial on cleaning your sprayer, view it here.

Oh, so easy clean-up!
That was it! So easy! I’m definitely going to do something with my DIY BFF real soon. Actually, if you look closely at the “after” picture, you’ll see a partly done chandelier…stay tuned for the second part of that how-to…there’s more!
Vintage Modern Refurbished Heirloom Wicker Chair…done!

The chair and cushion closeup. Notice the smoooooth finish.

The beautiful after and Klunkers.

The boys and the chair. Don’t know why they’re so serious…maybe they’re pulling their too-cool-for-school faces.
How do you like the color? Have you ever ventured and refurbished a family heirloom? Please share your DIY stories below!
All photography by Skaie Knox, HomeJelly
This post was sponsored by