
Before and after.
Yes…it was THAT house. You know, the “sore thumb”, the “neighborhood home value-killer”, or, most notoriously deemed, “the ugliest house on the block”, a place we called…home. Ugh. Still, we knew this 1948 beach bungalow had potential. With a little elbow grease, 4 weekends, and about 8 gallons of paint, this baby could be a real charmer. So, after successfully completing several DIY projects around the home, like taking on a redesign of my home office, we felt confident about tackling this “OMG-can-we-really-do-this?” kind of a project.

After 2.
About a month ago, my husband Matt and I boldly went where we’ve never DIY been before: rehabbing the exterior of our rental home. Yep, I said…rental.
Most of our friends and family asked us, “Is your landlord paying for it?” Our reply: “Uh…nope. We’re foot’n the bill.”
As we have discovered, when it comes to the cosmetics of a rental, not all landlords are interested in words like “cute” or “updated”. They’re running a business, and if yours is anyone like ours, he’s reaping as much profit as possible, hiring the cheapest of labor when needed, and, if there’s anything outside of regular maintenance, like dead tree removal or crawl space screen repairing, the only way he’ll crow bar open his wallet is if there’s any possibility of a code violation or personal injury.
Sheesh.
Still, he is who he is and, despite the out-of-pocket expenses, we were determined not to be the THAT house anymore. So, with a budget of $300 (and about $100 more for the inevitable “unexpected” expenses), we ventured off the couch and into the 3-dimensional world of DIY curb appeal makeovers.
Weekend 1

Project foreman Klunkers with tools and supplies.
Tools and supplies: Everything was nice and neatly organized on day 1 (uh, chortle!). Of course the foreman had to check on our tools and supplies like scrapers, extension polls, ladders, drop cloths, caulk and caulking guns (which we ended up not using), window glaze, stucco patch, spatulas, rollers, tarps, power sprayer, and, of course the plethora of pails of paint and different sized brushes.

Power washing.
Power washing: first things first. We power washed every surface which really removed a ton of dirt, debris, old peeling paint, and cleared the way for the next step: scraping (yippee.).
Note: Ask for advice! Our fantastic neighbor Mark was a huge help. We luckily ran into him before the makeover and found out that he used to own a house painting company when he was in college.
Not only did he give us some great tips and pointers, he saved us time and money, lent us some of his equipment and supplies, and even jumped in and gave us a hand! “Beers and pizza are coming your way, buddy!”

Scraping sills and shutter.
Scraping Sills and shutter: most DIY tutorials on exterior house painting will likely point out that scraping and prepping windows is the most arduous and labor-intensive step in this process. Believe them…this was no joke.
Seriously, I almost cried by the end of the weekend, it seemed the end was never in sight. Luckily, we did the research, kept our heads, hands and backs in the game and finished about 60% by day 2.
Tip: scrape across the grain to make it easier to remove old, pealing paint. Be careful, though, to not scrap too far into the wood creating the need to patch it later.

Stucco patching.
Stucco patching: As I whittled away at scraping the front door, window sills and ledges, Matt and neighbor Mark started patching up the many holes and inconsistencies of the old stucco walls. The pre-mixed stucco patch was really easy to work with and had fantastic results.
Mark’s tip: make sure to roughen up the finish with a little sand paper before it completely dries. This helps it blend in nicely with the old finish.

Window glazing.
Window glazing: this step took patience as well. After scraping all the old hard and chipping window glaze (probably from the 1960’s!), a new seal needed to be applied.
Its consistency is a little softer than Play-Doh, and far more messy. Once I rolled it in my hands and made it into a long worm-like form, I pressed it into the sill, then, using a spatula, formed it into a nice flat edge.
Fewww…was I stoked to be done with the windows!

Inspiration.
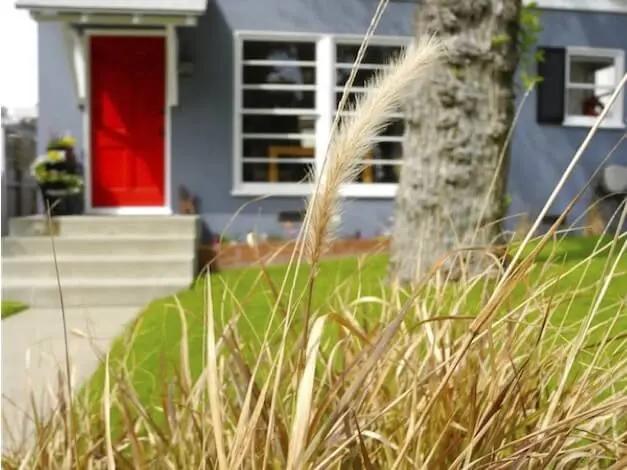
Inspiration: during the week before, and while walking Klunkers, we noticed several houses, like the one above, with colors we liked. Soon, we were driving around our neighborhood with a color wheel trying to find samples we could choose from. This is a great tip if you’re a bit at a loss as to what color you want for your home.

Paint selecting.
Paint selecting: Before cleaning up and calling it a weekend, Matt began the paint selecting process. It was really smart to do this at this stage of the project, because it gave us a week to live with the colors.
We even polled passersby and posted this photo on Facebook, receiving all kinds of comments as to which ones our friends and family preferred. We were leaning towards the middle shade. The neighorhood/Facebook poll winner? The color on the…left!
Note: notice the window ledge…this was a real DIY challenge!!!

More paint selecting.
More paint selecting: I took this photo a few days later…needless to say, we had a time deciding exactly what color we wanted. I ended up mixing the light and dark colors (the left and right swatches from the photo before) making a custom color that was perfect!
Note: Be sure to buy the sample size (just $2.98 a jar at box stores-see what Matt’s holding) and paint it on a couple exterior walls to see how the light affects the paint hue. Expect to buy 2-3 different shades in several different colors to get it right.
We ended up testing about eight of them…or was it nine?
Week 2

Crumbling window ledge.
Fixing the crumbling window ledge: along with continuing the long saga of prepping the woodwork, this termite-infested and crumbling ledge had to be addressed (along with the one under the big window).
Our neighbor, Mark suggested we slap some bondo on it (remember, this was DIY war we were raging!), let it dry for a day, then sand it down and form a new ledge. Amazingly…it worked beautifully (see next photo and “after” close-up below)!

House painted.
House painted (with continued prepping): Come Sunday morning, we couldn’t hop out of bed early enough (sorry neighbors!) because it was painting day!
Before applying the blue paint, we had to prime all the woodwork: the top part of the house, the front door and window frames, sills, ledges, and shutter. Two coats was all it took, but with all the detailing, patching, and re-sanding, this took the whole rest of the day.
Funny thing was, when it finally came time to apply the blue paint, it took just a couple of hours and the immediate satisfaction was clear and so exciting!
Weekend 3 (Saturday only…took a rest on Sunday)

Painting the front door.
Painting the front door and remaining woodwork: with three or four coats in my future, I knew I had to get on to the first painting of the front door. We also had all woodwork to paint a glossy white, another energy-intensive part of the project.
Rain was in the forecast for the following Tuesday, so we knew we had to get most of the detail painting done by Saturday. Ultimately, after three coats of paint (brushed on the first time, rolled on the second, then, for a smooth texture, brushed on again the last layer) the door turned out just the way we wanted, happy and welcoming.
Stay, Klunkers!
Final Weekend 4!

Gardening.
Gardening: planting was the final step in making-over our home’s curb appeal. We chose a mix of perennials and annuals that had bursts of color, but ones that would not tend to overgrow.
Because we live close to the ocean, our soil is magnificently porous and rich, encouraging our plants to grow like crazy. Here is the list of plants and flowers we selected: viola, phlax, green leaf begonia, poppies, bacopa, lily of the nile, and society garlic.
We had bulbs from previous years still in the ground that had just begun to sprout, so we kept those in place and worked around them. Just in time for spring!

Welcome.
Welcome: we had always wanted a more welcoming front door and landing, and here, the love is expressed in the details: a newly painted door with new hardware, a hardy, but charming welcome mat, a rusted letter “K” (for Knox!), and, le piece de resistance, hand-painted stacked planters…a visitor-pleasing “wow!” feature.

Mailbox post with light.
Mailbox post with light: another fun and charming detail was painting our mailbox post (with a personal message to guests), then adding what is usually a solar pathway light to the top. This mailbox post with repurposed solar light was a fun home improvement project and another notch in my DIY post!
The “Afters”…

Charming curb appeal.

It’s in the details.

After windows, shutter, and ledge. The bondo worked! Thanks Mark!

The happily ever after.

Bird bath’s new location.
Update: we moved the bird bath to the front of the house for a better view of our splashing feathered friends.
Photography by Skaie Knox, HomeJelly