Before…

Before mailbox post. Hum-drum…
As the adage goes, the love is in the details. When it came to rehabbing our home’s curb appeal, we had to choose our battles as to how much “love” we wanted to give. With crumbling, termite infested window sills, chipping paint on every exterior wall from decades of neglect, and window panes so old and weather-worn, their seals literally chipping off just looking at them, we knew we were in for some serious “DIY hand-to-hand combat”. Needless to say, fine-tuning wasn’t at the top of our list.
Now, mind you, this is a rental house we’re talking about, and due to an indifferent landlord who could care less about updating his property, we decided to take matters into our own hands. So, after a couple weekend “tours of duty”, we had tackled the hard stuff and really transformed our home. Finally, it was time for the detailing. With a bit of creative thinking and a dwindling budget, we turned to our mundane mailbox post to try and maximize its delightful potential.
After!

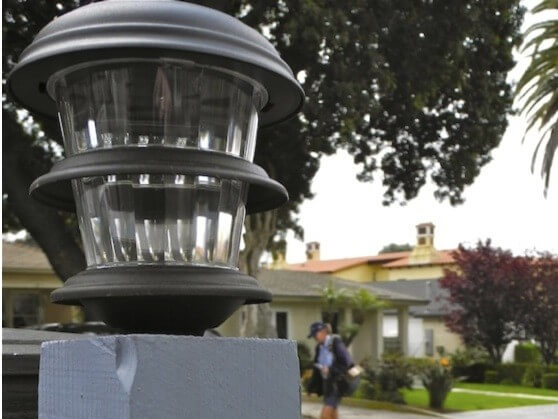
After mailbox with light.
A hum-drum mailbox post is now a welcoming entryway (and exit) that greets and even bids farewell to visitors. A repurposed $9.00 solar pathway light shines the way with no need for electrical hook-up.
Here’s what you’ll need:
- solar pathway light (easily found for around $9 at a box store)
- Tape measure or ruler
- hand saw
- drill and 5/8″ (15.88 mm) bit
- Rubber mallet
- xacto knife and small scissors
- painter’s tape
- paint and brushes (1 medium, 1 small detail brush)
Here’s what you do:

$9 pathway light.
1. Take an ordinary solar pathway light and remove the top (it should screw right off).

Cutting down the stake.
2. Measure stake approximately 4 1/2-5″ from screw threads (top portion of stake), then cut using your hand saw. Note: use a clamp to hold or have someone help you steady the stake as you cut.

Painting post.
3. Using your painter’s tape, mask off any areas you wish to protect, then apply 2-3 coats of desired color. Let dry approximately 1-2 hours.

Measuring legth of drill depth.
4. Be sure to measure the length of your stake to your drill bit to insure you can drill deep enough to make it flush to the post. Note: you may find that your drill bit is shorter than your stake. If so, go ahead and cut off as much as you need. (We actually decided to cut the length of the stake by about 1 1/2 inches to lessen the depth we would need to drill…no worries!).

Drilling hole.
5. Find the center of the post and begin drilling straight down. Note: use a step ladder or chair to position yourself above the post to make it easier to steady the drill. Tip: If you’d like try the Kawasaki 840110 Black 19.2-Volt Drill Kit, it comes with a bubble level…nice!

Pounding in the stake.
6. Pound in your stake (screw threads UP) so that it is flush with the post. Note: be sure to measure the depth of the hole BEFORE pounding it in. If the hole is not deep enough, you will have part of the stake exposed and it is very difficult to remove once its in. Tip: insert a pencil and mark how deep it is…compare it with your stake’s length.

Stencils.
7. Decide and print out what you’d like your post to “say”-ours reads “Hi” and “Bye”. I used the “Streetscript” font which is available at myfonts.com. Note: since the lettering is vertical, be sure to create an equal-sized box frame around each letter, then, when you cut it out you can line up the boxes evenly when you later tape it onto the post.

Cutting out stencil.
8. Using your xacto knife, start cutting out the lettering for your stencil. Once you’ve created a large enough opening, use a small pair of scissors to finish cutting out the letters.

9. Chose where you’d like to start your first letter and tape on the stencil as a guide to then hand paint your highlight color (I chose white). Be sure to use a small detail brush…it makes it so much easier. Note: because you created a box frame around each letter, you can now tape the next stencil right below (and touching) the first one and so on (as you might have noticed, the “e” in “Bye” is spaced a bit lower than I initially wanted…now, I kinda like its quirkiness!).

10. Now, hand paint the second layer using a popping color (we chose black to go with our home’s exterior accent color). You can paint just the inside, or use a shadow affect (leave the bottom and right sides of each letter their highlight color). Note: As mentioned in our “Stacked Planters” blog, this step takes a steady hand, so caffeine drinkers may want to hold off on that “cup o’Joe” until after this part of the project. Also…if you are nervous about messing up (who isn’t ?!?), don’t worry…you can always touch up the letters with the post’s main color (that’s blue, in this case).

Final post.
11. Screw on the light head…and voila!!!

After mailbox post and light.
Here’s what it looks like at night…

Mailbox post at night.
For questions regarding this project, contact [email protected]. Stay tuned for the mailbox makeover and tutorial!