
A + J floating initials sign. Photo by Oscar Zagal
I heart easy DIY projects!
So, when I wanted to personalize and create a surprise for my brother-in-law and my now sister-in-law’s wedding decor, I knew it had to be simple and fantastic. I also needed to stay within budget, so I reached into my reuse/repurpose toolbox of ideas…Pinterest to the rescue!
Thanks to the wonderful folks over at designlovefest.com, I was easily able to make these fabulous floating heart and initials signs, using an old doggie gate, chicken wire and napkins. The total cost? About $7 a piece! Below, I’ve included loads of photos, so I’m going to let the pictures do the talking along with my own step-by-step instructions and DIY play-by-play.
I heart the fabulous results of easy (and inexpensive) DIY projects!

Alexis + Johnnie with A + J sign in background. Photo by Oscar Zagal
Supplies:
• Large picture frame or repurposed/DIY’d frame (I used an old doggie gate, but you can also create one using reclaimed wood)
• chicken wire
• staple gun
• wire cutters
• needle nose pliers
• hammer
• napkins
• twine to hang
Optional for DIY frame:
• wood glue
• screw driver
• screws w/flat corner irons and flat straight bracket
Instructions:
Step #1: deconstruct your repurposed item. In this case, I deconstructed my doggie gate down to its frame.

Old doggie gate.

Deconstruct the old doggie gate.

Doggie gate frame with no hardware.
Step #2: Reconstruct your repurposed item into a frame.

Wood glue.

Apply wood glue to corners.

Use new hardware to finish securing the wood frame.

Attach new flat corner irons to keep frame sturdy.

Doggie gate repurposed into a picture frame.

Doggie gate repurposed into a 3-sided, lean-to frame.
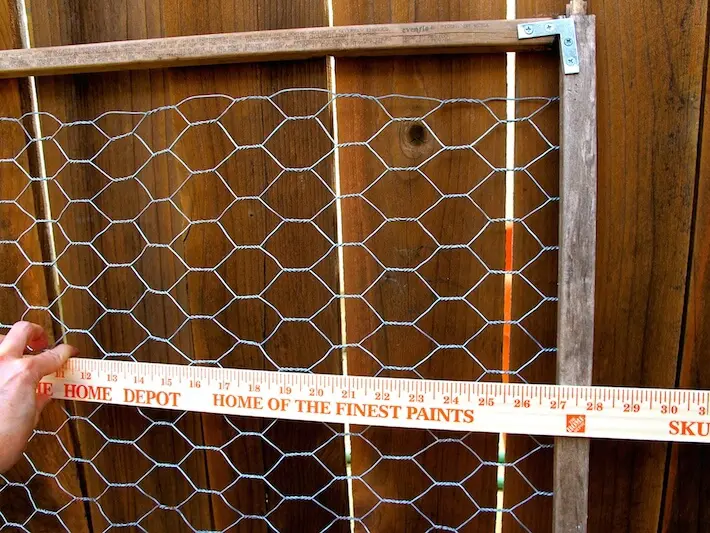
Step #3: Attach chicken wire with staple gun to middle of inside frame.

Found free chicken wire. A good place to find free chicken wire is construction sites. Ask them…they’ll probably give it to you for free!

Attach chicken wire to frame using large staples.
Step #4: Snip the edges of chicken wire, then twist and flatten to finish.

Snip excess wire using wire cutters.

Twist back the snipped wire ends with a needle nose pliers

Hammer flat the wire ends to finish.

Finished chicken wired frame.
Step #5: Measure then mark the center of your chicken wire, then begin stuffing your napkins into the shape(s) you desire.

Find the center of your chicken wire.

Mark center with a Sharpie pen.

Open up napkin, then grab the center.

Push the center of the napkin into one of the chicken wire holes.

Start by creating the outline of a heart.

Do the same steps with your initials.
Step #6: Continue filling in your shapes until you are done. Note: feel free to double stuff to create the fullness you want.

Start filling in your heart and letter shapes.
You’re done!

Klunkers approves.

Finished floating heart sign.

Floating napkin heart sign for the dessert table feature decor. source: Photo by Oscar Zagal

Floating napkin heart sign decorates the cake table. Photo by Oscar Zagal

A + J sign closeup at the wedding site. source: Photo by Oscar Zagal

A + J sign over gift table. source: Photo by Oscar Zagal
All photos by Skaie Knox, except where indicated, HomeJelly