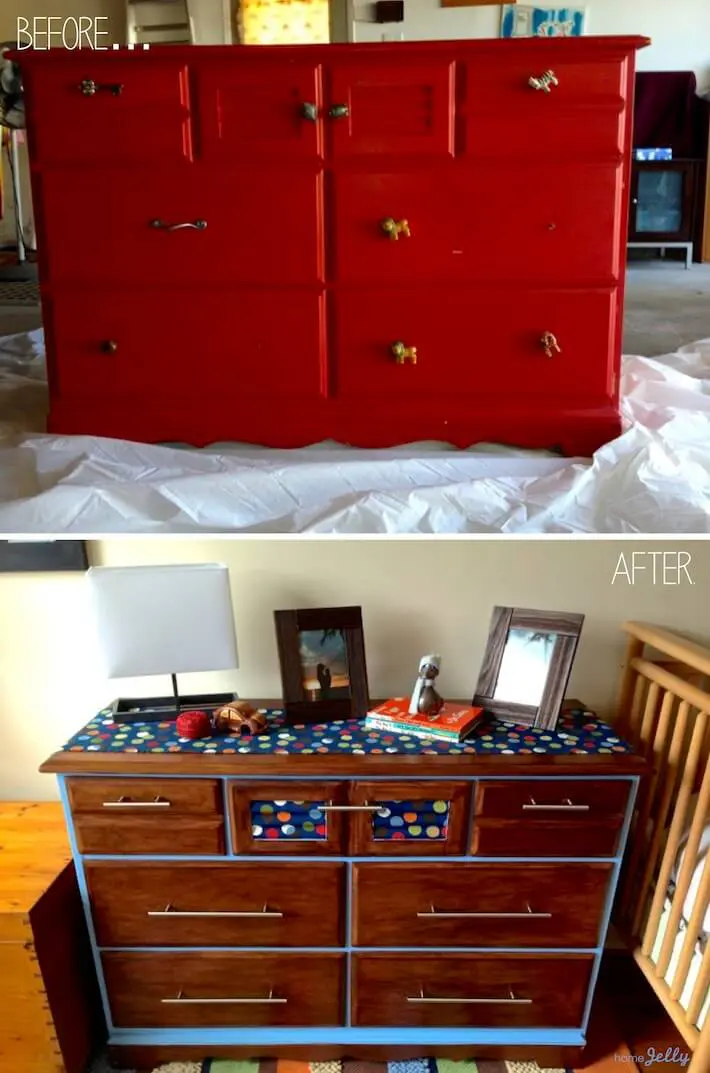

Kid’s dresser before and after.
When I was asked to help my bestie, Andrea, refinish a freebee cabinet she scored for her cutie-patootie son, Lars, I was absolutely excited! Her hubby thought it couldn’t be done – this monstrosity piece of furniture had far too many coats of paint and years of wear and tear. Challenge on!
Immediately, I jumped onto Pinterest to search for inspiration and doable ideas. Pins were flying! We almost had too many choices, but “A” had a good idea of what she wanted – a mix between Scandinavian clean and modern lines with a touch of kid fun.
Hmm…that meant stripping, sanding, and more sanding. Yep. The thick, sticky paint was exceptionally stubborn to remove. There was also a wavy wood detail in the middle top drawer that presented us with a DIY finishing challenge. Luckily, this resulted in one of those coveted and often elusive “happy accidents” (cue the cartwheels)!
Despite the exhaustive amount of “elbow grease” required to get down to bare wood, this dressed up dresser project went off quite smoothly; a do-it-herself example of “girl power” persistence for Lars to experience first-hand.

Supplies.
Supplies:
• Dresser
• Paint stripper – we used JASCO Premium Paint & Epoxy Remover
• Scraper
• Latex gloves
• Electric hand sander
• Sand paper (medium – P60 and fine – P120)
• Painter’s tape
• Paint brushes
• Semi-gloss paint – for detail edging
• Wood stain – we used American Walnut
• Optional: wood putty and spackle knife – to fill in any dents or gouges
Instructions:
1. Apply paint stripper. Be generous with how much stripper you use and check the directions for how long you should leave on before removing. Note: be sure to wear gloves, as stripper can burn if it touches your skin.

Apply the paint stripper.
2. Hand scrape, then sand. Depending on the amount of old paint, you may need to apply more than one coat of stripper. We had to use three (stop laughing, Cliff).

Scrape off paint.

Sand off excess paint.

Sanding, sanding and more sanding!

Mom, you forgot your gloves!

“A” sanding the cabinets. Gloves on!

Lars even did his part…though, he preferred to sand with the smooth side of the paper.

Sanding completed.
3. Tape off and paint front detail. You can really do whatever you wish to your dresser…be creative!

Tape off for paint detailing.

Painting the accent color.

Painting the accent detail.
5. Apply wood stain, then allow to cure 24 hours. The more coats, the darker the finish. You can either use stain or clear poly urethane, it’s up to you!

Apply the stain and poly.

Dresser progress.
Note: this particular dresser had a wavy front face, so instead of simply painting it, (which we initially did, but didn’t like how it looked overall), I thought it might be fun to add fabric to it that would match the existing colors in Lars’ room. It worked!

Painted inside drawer detail. Alone it just didn’t work…

So, I painted on fabric Mod Podge…

And pressed on a fun fabric panel.
6. Install new hardware. You can go vintage, modern, or use whatever pulls you wish! Go nuts, people!
The Results!

Kid cabinet in Lars’ room.

Kid cabinet after closeup.

Lars loves his new cabinet.
I also made a runner to match the drawers for the dresser top, or, like mom and dad placed here, smartly upon Lars’ toy chest. Fun!
What would you do to an old dresser? Paint or stain or both?
All photos by Skaie Knox and Andrea White Kjoss, HomeJelly