
We had a couple of old dressers floating around following a remodel and couldnʼt bring ourselves to throw them away. That combined with a lack of yard space for traditional raised beds lead up to this idea. These instructions are for basically building what we built, but as you can imagine there are lots of variations on this design that will allow you to make it your own. Also, a word of caution: We have not tried to build this design as a free standing structure – i.e. not secured to a fence or building – and these directions are not for a free standing design.
Here’s what you’ll need:
• two or more 2×4 or 2×6 boards in the length necessary to allow you to lean against a fence, house or another structure at a 45-60 degree angle
• additional 1×4 or 2×4 scraps or boards to make brackets for the drawers to slide into – 4 per drawer
• 2×4 to cut as cross bracing to go below each dresser drawer
• dresser drawers
• deck or long drywall screws
• protractor
• table saw or circular saw
• power drill/screwdriver
Here’s what you do:
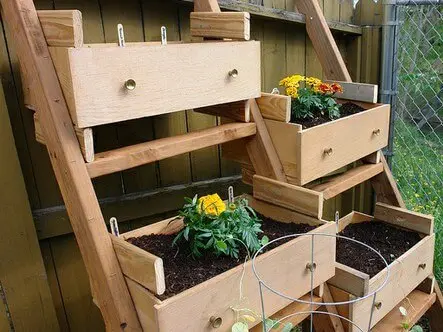
 1. SUPPORT BOARDS: Begin by determining the necessary length of your three support boards that will lean against the fence. We did this by simply leaning the boards up against the fence and adjusting them until we were able to hold a drawer between them level. We used about a 60 degree angle. Once youʼve determined the angle youʼre going to have the support boards at, use a protractor to mark the angle of your cut and then cut the board accordingly. As you can see from the image on the left, since there was an additional support in the fence, we notched our boards so they would slide over this support. After the first two support boards are cut, secure the first one to the structure with two dry wall or deck screws.
Next, determine how wide you need to have your second (the middle one for our design) support board from the first. Youʼll want it snug enough to provide some natural tension to help hold the drawer, but not so tight that you canʼt slide the drawers. Secure the second support board at the appropriate width.
2. CROSS BRACES: Once the first two support boards are in, place, cut the two cross braces (one for each drawer) to the same length as the width between the two support boards. Secure the first cross brace, working from the top.

3. RAILINGS: Cut your scraps that will act as the railings the drawer slides along. Secure the two bottom drawer railings so that they rest on the cross brace in the front with the backs extending at least 6 inches back toward the fence or structure. Secure these to the support boards. Once these first two railings are in place, fit your drawer into the space and determine where the top railings should be placed. We fit ours so that the drawer could still slide in and out, but thatʼs not necessary and the drawers could be fixed in place.
4. LEVEL & SECURE DRAWERS: You will want to ensure that your drawers are level. Once the location of these railings are determined, secure them to the support boards. After all railings are in place, slide or secure your drawer into place.
5. FINISHING TOUCHES: Repeat this last set of instructions by starting with your bottom cross brace through installation of the railings for the second drawer working down toward the ground until the desired number of drawers are installed. To add a second column of drawers or more, add another support beam as you did with the first two and follow all steps through installation of the drawers. We recommend doing one column at a time.
THINGS TO CONSIDER: You may wish to treat or line the dresser drawers, especially the bottoms, to ensure they donʼt rot or sag throughout the season. If you live in a rainy area, you may need to drill holes for drainage. Also, dresser drawers arenʼt quite as deep as traditional raised beds or larger containers, so plant spacing can become an issue as can the soil drying out too quickly if the weather is particularly warm.
We hope these instructions are helpful and that you give this a try. Itʼs a great way to recycle and save space. An added bonus is that it kept our dogs out of the garden! Check out Repurposed Dresser Makes A Fantastic Raised Garden Part 2 for more outdoor fun! Happy gardening.
Dresser drawer available on DiggersList.com. Veggie Garden photos courtesy of Meg.