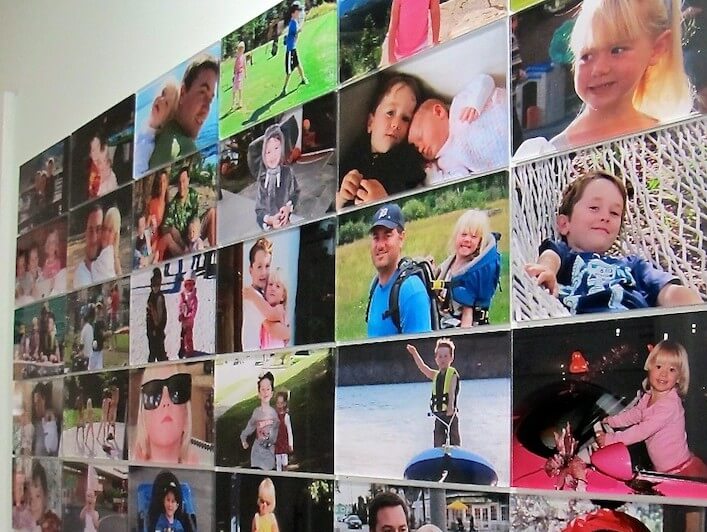

Magnetic photo gallery wall.
When November and the holiday season rolls around each year, I often think about my family sprinkled from coast to coast – my mom (whom I’m so happy lives just one county over), my brothers and in-laws, loads of cousins, aunts and uncles, and a growing Christmas list of nieces and nephews (even the kidletts of friends who call me “Auntie Skaie”!).
So, to honor them, I thought it would be fun to post a series of family-friendly projects like this weekend’s DIY project: How to create a magnetic family photo gallery, courtesy of our friend and neighbor, Kyle. I thought I’d include some fabulous tips, dos and don’ts and links to favorably reviewed products to help you on your way. Oh, one more thing…don’t forget to “fall back” your clocks this Sunday. And, awaaaaay we go!
Magnetic Family Photo Gallery Supplies:
• 1 gallon magnetic paint – MagnaMagic/Active Wall Magnetic Wall Paint, $58.36 p/gal was hands down the best reviewed
magnetic paint product! It has the lowest VOCs and, according to one reviewer, “even with shipping this was cheaper than getting 3 quarts at Home Depot of the other brand. Love it. ”
• foam roller – Wooster Brush Foam Roller Cover 2-Pack, 9-Inch, $2.65 – $6.06, this is a product I’ve used and love.
• sanding sponges -$4.04 (click here
to purchase) 3.75 in by 2.625 in by 1 in, Fine/Medium. Also available at any box store. The number of sponges you’ll need will depend on the size of your gallery wall. Start off with 3 or 4…if you don’t end up using them, you can certainly store them for the next project. Yes!
• 1 quart or gallon regular paint – use this in any color you wish to paint over the magnet paint.
• paint brush(es) – for cutting in on ceilings and base boards
• adhesive magnetic sheets – I found these on orientaltrading.com. Great reviews and perfect for this project.
• acrylic frames – these lightweight frames make magnetically mounting them on your wall a cinch. I found these acrylic frames that include two magnets, prices start at $2.30 p/frame for 20-43 ordered (I’ve never used them, so let me know what you think). You can also sandwich mount your photos for a more rich look.
• printable magnetic sheets (optional) – if you want to go super inexpensive, you can simply print off photos onto the magnets themselves. Here are two options: Avery Magnet Sheets, 8.5 x 11 Inches, White, 5 Pack and Staples® Inkjet Magnetic Sheets (both had decent reviews).
• tile spacers – for perfectly setting and maintaining the look of your gallery wall. Click here to purchase online, or find them at any box or hardware store.
Instructions:
1. Prep the area you wish to paint: to save time and money, measure off the area you wish to make as your gallery wall. It’s doubtful you’ll want to adhere photos as far down as the floor or up to the corner of the ceiling, (unless you’re my quirky cousin Jane), so, with a pencil, mark off a square or rectangle (or any shape for that matter) where you wish the magnet paint to go.
2. Apply 3-4 coats of magnetic paint: yep. That’s the catch. Still, the benefits will be worth it, and this is also why I mentioned measuring off a specific area in step 1. Note: The reviewers who used this paint all mentioned that 4 coats had the best magnetic results…(look on the bright side…you can skip the gym that day!). Aaaaaand then…allow ample time to dry.
- Tip 1: Since magnetic paint has iron powder mixed in, the texture can be quite thick. So, DO use a foam roller for a smoother texture, DON’T use a textured roller or paint brush…you’ll be sanding for days!
- Tip 2: it is important to continue stirring this type of paint every so often (the iron powder loves to settle to the bottom of the can). This will insure that your magnets will stick on all parts of your wall.
3. Sand walls: using your sanding sponge(s), start sanding the magnetic paint to smooth out the texture. A reviewer mentioned they were worried this might reduce the magnetic power of the wall, but in fact, it hadn’t. Sand away!
4. Apply desired wall paint: as a design nerd, I’m always encouraging y’all to be the masters of your own domain and create what you want in your space. The cool thing is, painting over this brand is totally doable! The magnetic properties of the paint underneath will work perfectly well. Paint away!
5. Print and frame your photos: this is a good thing to do while the paint dries…perfect for us multitaskers!
And now…the fun part!

Apply large magnet sheet to back of each photo.
6. Apply large magnet sheet to back of each photo: to insure a “good stick”, cut your magnets so that they almost cover the entire size of your photo. If you opted for frames that come with magnets or printable magnets, you can either skip this step or maybe add more adhesive magnets to their backs.
- Tip: DO spend the little extra money for decent magnets (quality and/or size). DON’T think you can get away with frames falling off the wall if you choose thin, cheap or small ones.

Place each photo snug against tile spacer.

Tile spacer spacing photos.
7. Place each photo snug against tile spacer: for a uniform and neat gallery, place the first few frames onto the wall. Next, like laying wall or backsplash tile, pop a tile spacer in the middle of those frames, then snugly push them against the spacer. Continue doing the same with the rest of your images. Fini!
- Tip 1: put on some good, upbeat music for a fun time…plus, it’ll make the time go by in a FLASH! (yeah, I just did that!).
- Tip 2: to remove tile spacers, use a tooth pick or tweezers.

Magnetic photo gallery.
I would love to hear if any of y’all have any tips or thoughts on using magnetic paint. Comment below and share away!
Photography by Skaie Knox, HomeJelly