
From Trash to Home Gym – before and after.
This year, we decided to turn our once garage start-up office into a home gym. Funny thing is, this created a storage issue (weights, elastic bands, towels, etc.). Stumbling over gear does not further fitness, just a possible rolled ankle (uh, no thank you).
As DIY fate would have it, I just happened across a dresser that someone left out on their lawn to be trashed (NO…err…YES!). It was a decent, all wood piece, but some of the drawers were missing and some didn’t close right…perfect!
See Also: Kid’s Dresser Gets All Dressed Up
I invite you now to lace up your cross trainers and join me as I go through an upcycling workout that’s simple and something you do to suit your needs. I was fortunate to be sent HomeRight’s Finish Max paint sprayer and their fabulous spray shelter (ooh, my newest best DIY friend!) to make the job easier. I’ll give you the skinny (too much?) on how to customized a dresser into a home gym cabinet (or whatever you’d like to store) to make it fit and fab!
Don’t forget to stretch first!

Tip: great to check the scrap lumber at Home Depot for great deals.
Upcycling Supplies:
• electric hand sander and sanding block
• sand paper (medium – P60 and fine – P120)
• hand saw or jig saw
• 1/4″ scrap wood (for shelf inserts)
• wood screws
• painter’s tape
• paint brushes
• paint – semi-gloss, satin, or matte (whichever you’d like)
• HomeRight Finish Max paint sprayer
• Briwax or wood stain (whichever you’d like to use)
Optional features:
• hooks
• new hardware
• carpet
Gym Cabinet How-To:
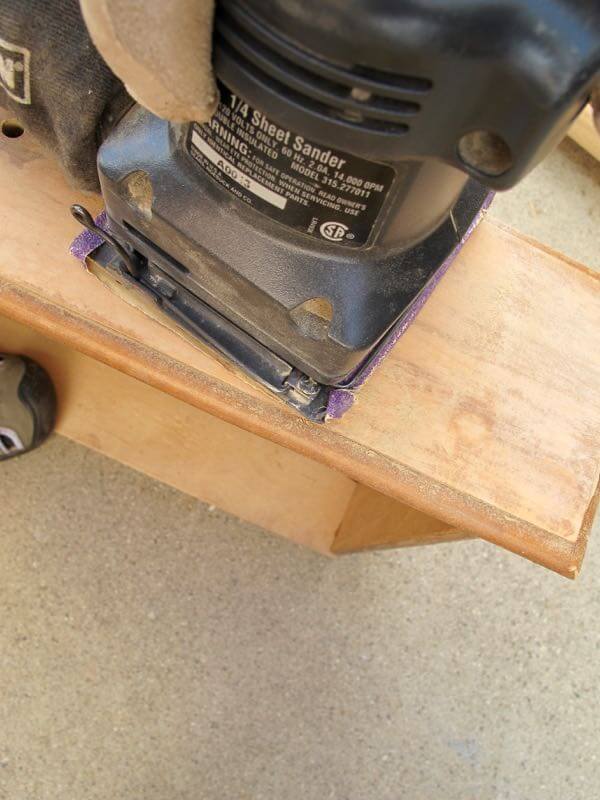
1. Remove drawers, hardware and backing, then sand.

Once the drawers are removed you can really see the bones of the dresser ready to repurpose and refurbish.

Remove hardware.

Sand, sand and sand some more.

…and sand some more!
2. Remove drawer tracks, then, using a hand saw or jig saw, cut dresser wood between drawers to open it up for shelving.

Remove the drawer tracks.

Using your jigsaw, remove parts of the cabinet to create a large shelf opening.
3. Measure the area for 1/4″ scrap piece shelf.

Measure your new shelf piece.
4. Insert and nail or screw in 1/4″ scrap wood for shelving and back. You can also reuse the removed tracks to use for shelf support. Note: I included a tilted shelf for hand weights which added a step of screwing the wood piece to the back of the dresser – it was super easy!

Cut your new shelf piece.

Nail in the shelf.

Shelf completed.

Screw in the tilted shelf from underneath – use at least four screws for support. I also butted two piece of wood underneath the middle section of the shelf for more strength.

Tilted shelf complete.

Measure and cut the back panel piece.

Screw in to keep the dust out of the cabinet and to finish the piece nicely.

Back panel completed.
5. Prep cabinet for painting, tape plastic over top and back, then tape feet.

Tape back of old hardware holes.

Fill with wood putty and allow to dry.

Sand wood putty smooth.

Tape off top edges.

Tape and cover with plastic to avoid overspray.
6. Spray paint exterior and drawer fronts, allow to dry. I first set up my new HomeRight Spray Shelter and absolutely loved it…so did Krinkles.

Spray dresser and drawer fronts – the HomeRight Finish Max is fantastic and affordable.
7. Remove plastic and finish top, feet, shelves and inside backing with polyurethane stain or Briwax. Choose any color of Briwax that melts your butter! Extra: add custom touches like taping off to create stripe of unfinished wood or add color with paint. You can even add a decoupaged stripe, lettering, pattern or design using wrapping paper, wallpaper, or fabric.

Taping detail on top of cabinet.

Measuring detail line on legs for taping.

Apply wood stain or Briwax.

Wipe excess into the wood as bit by bit

Remove tape to reveal detailing.
8. Finish: attach new or existing hardware, carpet, hooks, towel bar or anything to suit your needs. I added carpet to the tilted shelf for better traction and protection of wood and customized the middle top drawer to mount the power amp. Kinda gives it a cool, rock’n look, don’tcha think?

Attach new hardware and any other accessories you’d like.
The Upcycled Home Gym Cabinet is Complete!

Finished gym cabinet!

Details and outdoor gate hardware make this cabinet smart to use and look at each workout.

Such handy storage for weights, workout bands, towels and visual/audio equipment.

This trash’d to gym cabinet is inspiring, too.

The top’s simple detailing.

Handy storage and cool garage and gate hardware make this a useful and a great man-cave piece.

Tilted shelf is great to keep weights organized and easy to access and put away. Note: if you’ve got little ones who might drag out a weight or two, you can add a child-proof, hinged door for added safety.

Who knew a curbside and ready-to-be-trashed, broken dresser could turn out so beautifully useful!

Krinkles definitely approves!
All photography by Skaie Knox, HomeJelly