
In the world of VW buses, the Type 2 1971 Westfalia, with disc brakes and air cooled engine, in my opinion, is the best of all VW buses. So, when I came across this DIY project by Bryan Upton (mind you, this one’s for advanced DIYers), I just had to honk my horn about it. Constructed of lumber, hardware and found car parts from the wheels up, its cost is approximately $500 (mattress not included); a pretty descent price compared to other store bought bunk beds. For all you micro-bus fans with kids, who’d love to pass on their passion for vintage VW, follow the how-to directions for completing this challenging project. Don’t forget the “Honk if anything falls off!” bumper sticker!
 Parts disassembled to show how easily they can be moved and/or transported.

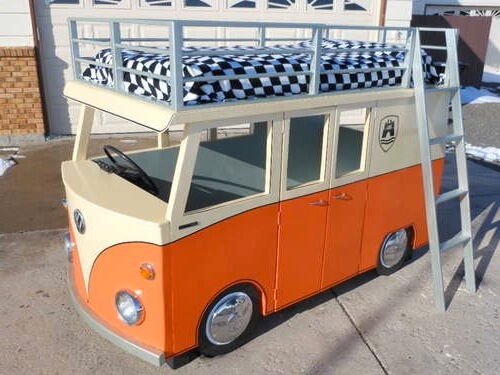
The main mattress is accessed via a ladder, while the playroom with convertible futon for sleepovers, sits appropriately inside…just like the real thing!

A salvaged steering wheel gives kids a turn at a more realistic play on make-believe.

This DIYer had an eye for detail, from the headlights to the decals. Groovy!
Materials:
Lumber
5 sheets of 4’x8′ 1/4 inch plywood. I used a premium floor underlayment. The price was really good and of durable quality.
(These are for outer skin.)
2 sheets of 4’x8′ 3/4 inch MDF or plywood. (In my project I used 1/2 inch thick and needed to add extra bracing underneath it. I would definitely use 3/4 inch for better stability and less bracing.)
(These are for the floors of top and bottom bases.)
11 sticks of 3/4″x4′ dowels.
(These are for the safety railing/faux cargo rack.)
7 pieces of 1″x2″x8′ firring strips.
(These are for safety railing/fuax cargo rack.)
3 pieces 1″x3″x8′ firring strips.
(These are for the ladder.)
9 pieces of 2″x2″x8′ firring strips.
(These are for the frames of doors and safety rail/faux cargo rack.)
2 pieces of 2″x6″x8′ studs.
(These are for ribs of curved front end.)
12 – 14 pieces of 2″x3″x8′ studs. The amount is dependent on how much bracing you are comfortable with.
(These are for the majority of all the framing.)
1 piece of 4″x4″x4′ post. Some home stores will cut this for you. If not, a full 6 or 8 foot stick may need to be bought.
4, pre-cut 16″ diameter, 3/4 inch thick plywood circles. Some home stores sell these. Otherwise you will have to cut your own.
1 piece of 3/4″x12″x44.5″ pine board. Try to get a nice knot-free piece here.
Hardware
1 box of drywall screws.
1 box of 2″ deck screws.
1 box of 2.5″ deck screws.
1 small box of 3.5″ deck screws.
4, 1/4 inch x 3″ carriage bolts.
4, 1/4 inch washers.
4, 1/4 inch nuts.
4 hinges for the doors
*12 “L” brackets 4″x4″ These can be found in the door and hinge section of Home stores.
*12 “L” brackets 1″x1″ These can be found in the Home store area that contains framing hardware, such as hurricane straps.
* Pictures supplied in “The Wall Frames step” of the how-to instructions.
Tools
Jigsaw and/or Band-saw if available. (Wishlist for me)
Power drill
Countersink bit
Compound miter saw
Table saw, if available
Hand sander and sand paper
Wood filler
Paints of whatever color you prefer
Clamps for when you need that 3rd or 5th hand to hold pieces up.
Accents
Hubcaps
Steering Wheel
Headlights
Pin striping
Little decals and stick-ons.
Instructions: Visit Uptonb via Instructables to read the full how-to instructions.
All photos, materials list, and project how-to: Uptonb, Instructables