
Rustic romantic Thanksgiving table.
This year, I really wanted to create a rustic and romantic Thanksgiving tablescape using natural and found items in and around my home. It’s amazing what you can discover and make so easily without spending much money at all. Here is how I went about dressing my newly made-over table this year that also includes the following how-tos:
• Layering with natural elements (including the centerpiece)
• Create a scrap paper “Give Thanks” decorative flag
• Make a canvas keepsake for your guests
Layering your Thanksgiving table with natural elements:
I’m really a fan of using natural elements, so I did what I could to incorporate them into my table setting for the upcoming Thanksgiving feast. I almost always start with burlap. I just love how it brings texture to a table, but it’s also super natural and very forgiving. I get my burlap at Home Depot (you can find it in the garden section on a long roll and it costs approximately $10 for a lot- you can’t beat that!).

Layer with natural elements like burlap.
Next, I shopped around my house to see what I could use to “layer up” my table. I started with an old silver serving tray, cut some pine branches from my girlfriend’s tree and grabbed a white pumpkin that I had on my porch.

Silver tray centerpiece, white pumpkin and pine needles.
I am a big believer in using china versus having it simply spend its life in a china cabinet. So, I used the set that was given to me by my mother-in-law. I especially like it for Thanksgiving because of its brown undertones and creamy background. For some reason I was drawn to my green napkins, so I used those to complement the setting.

Use your beautiful china.
Having fresh flowers on my table is always a must, so I grabbed my go-to mercury glass vases and used simple yet classic roses to fill in space. Finally, pomegranates, artichokes and mini pumpkins were the last layer. Once complete, I loved the natural yet romantic look. It didn’t take long, or cost much, and most of the items I can use over the next few weeks to decorate with offers a perfect dual-purpose setting.

Continue layering with mercury glass vases, roses, artichokes and pomegranates.
Create a scrap paper “Give Thanks” decorative flag
Lastly, I have a love affair with paper and I do like to make a little something special for guests, so I decided on a couple of things to go along with the table. First, using scraps of scrapbooking paper and layering piece upon piece, a “Give Thanks” flag resulted. I adorned it with leftover ribbon and bits and pieces of ephemera that I already had.

Scrap paper “Give Thanks” flag.
Here’s what you’ll need:
• scraps of scrapbooking paper
• card stock paper or scrap of thin cardboard (note: you can often find them at the bottom of gift bags)
• glue or mod podge
• ribbon
• decorative moss, berries, glitter balls, glitter, etc.
• wooden dowel
• floral tape
• scissors/Paper Edger Scissors
Here’s what you do:
1. Take a piece of card stock or scrap cardboard paper and cut out a flag shaped triangle.
2. Wrap the shortest flat end of the triangle/pennant around the wooden dowel and glue in place.
3. Print out “Give Thanks” or any message you wish, then cut a nice edge with your scalloped paper edger scissors. Optional: you can glue your “Give Thanks” piece of paper onto cardboard paper or something rustic-looking to create a frame.
4. Glue this onto your flag, then decorate with ribbon, moss, berries, etc. Be creative!
5. Wrap your wooden dowel with floral tape or ribbon.
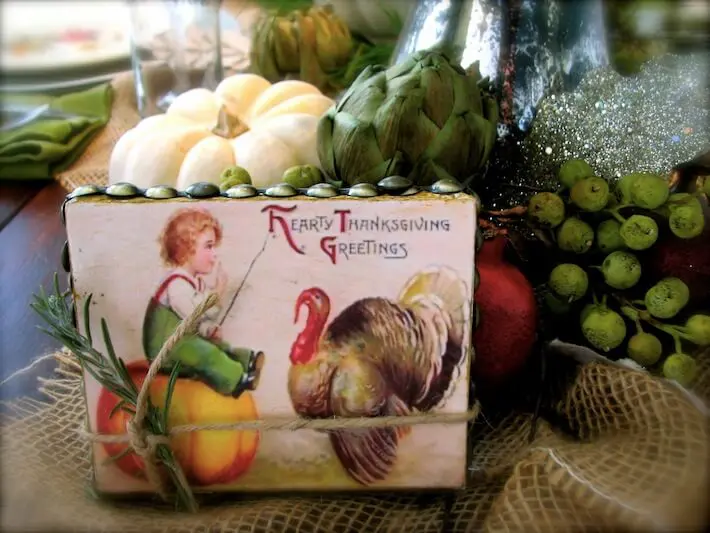
Make a canvas keepsake for your guests
For guests, a small piece of canvas art was left on the table which really added charm to the overall setting. They will also be able to take it home as a special keepsake and decorative piece to display next year.

Canvas keepsake.
Here’s what you’ll need:
• a small piece of canvas or scrap piece of wood (3″x5″ or 4″x6″ is perfect size)
• decoupage glue (matte or glossy, depends on your taste)
• an image on paper (wrapping paper, a magazine or an image printed off the computer)
• Optional: ribbon, nail heads, twine, rosemary
Here’s what you do:
1. Choose your image. I wanted a vintage look so I googled images on the computer, selected the images I liked and simply printed them onto copy paper.
2. Cut the image the size of the canvas.
3. Brush a small amount of glue onto the canvas, then place the image on the canvas and brush more glue on top of the image. It will go on cloudy but will dry clear.
4. Once dry, you have a darling mini picture. But, if you want to dress it up even more you can add ribbon, burlap or even small nail heads around the edge of the frame.
5. After that, I simply tied a piece of twine with a sprig of rosemary around it (both of which I had) and placed on the table. FYI, everything needed for this simple craft can be found in your home or purchased at most craft stores.

Wrap canvas keepsake with twine and rosemary.
How will you decorate your Thanksgiving table? Wanna share any neat ideas?