
Festive upcycled holiday pumpkins.
This post contains affiliate links.
I think we can all agree that pumpkins have traditionally been Halloween’s decorative mascot, carved or otherwise. Over the past several years though, Thanksgiving has begun to adopt this “gourdeous” gourd for its decor purposes, allowing us to stretch our budgets into a second holiday (thank goodness!).
Well, I’ve got to say, there is a positive to everything, even within this challenging and lingering economy. It has tipped its hat to the English proverb, “Necessity is the mother of invention,” and with many creative DIYers thinking and rethinking items to re-invent, we have come up with some fantastic ways to pull our pumpkins into yet another holiday – Christmas! Hallelujah!
I thought I’d give it a go and see what I could create using only supplies and materials I had at home. In other words, my challenge was to spend NO MONEY on this project! How’d I do?
Note: by all means, feel free to purchase the supplies you need…I just happen to have loads leftover items from loads of projects I do for y’all!
Supplies:

Upcycled pumpkin supplies.
- • Halloween/Thanksgiving pumpkins (mini or regular sized)
- • craft paints (Christmas and/or Hanukkah colors…or whatever you fancy!)
- • small and varying sized brushes
- • glitter
- • glue or mod podge
- • Optional: glitter paint
- • Optional: ribbon or decorative leaves
- • Note: though painters tape is in the above supplies list, I discovered that after applying a small strip to one of the pumpkins, it pulled off the paint. The nature of this fruit renders the surface just a tad moist, so the paint is quite delicate to work with.
Instructions:
1. Place your pumpkin(s) on newspaper or tarp and cover entirely with paint (even the stem). I chose white, because I wanted to have that as my base color.

Cover pumpkin with paint.
2. After the paint has dried, use different sized brushes to paint stripes, plaids, or polka dots. Cut the end off a carrot to help you make easy (and free) circles. Note: use plastic bottle caps to place underneath drying pumpkins.

Use different sized brushes to decorate.

Cut a carrot to make polka dots.

Use bottle caps to place under drying pumpkins.
3. If you’d like to add sparkle to your pumpkin, paint stripes and/or polka dots with a thin layer of sparkle paint (I used Martha Stewart‘s). Or brush on some mod podge
, then sprinkle your glitter to cover.

Glitter paint gives a nice affect. I used Martha Stewart’s brand…it’s very nice, especially when you use 2-3 layers.

Use mod podge to adhere glitter.

Glitter glams up your pumpkins.
5. Allow to dry. Voilà! Optional: you can tie a ribbon around the stem for a more festive look, or add an artificial leaf or leaves. With the mini pumpkins, you can drill a hole in the stems and hang them, or group them together on a table or countertop.

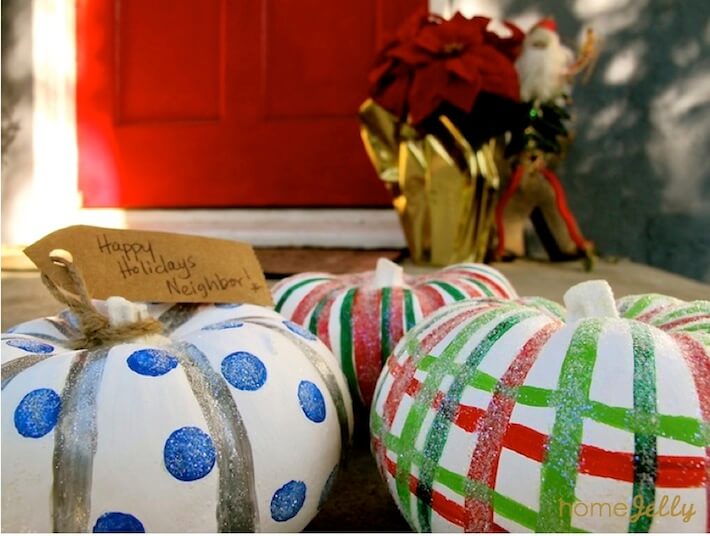
Holiday pumpkins after.

Upcycled pumpkins are wonderful neighbor gifts.
Optional decorations:
After painting the base color, try these other ways to decorate your Christmas pumpkin:
• Cut a small or mini carrot crosswise and dip it into paint to make dots.
• Wrap a string around and around and around, paint over it with a second color, then remove for an artsy look.
• Paint with glitter paint, then add more for a sparkly effect.
• Decoupage Christmas images or some of your favorite things or words
• Give your children some paint and brushes, then have them go nuts!
All photography by Skaie Knox, HomeJelly
How would you decorate your pumpkin?