

This post contains affiliate links.
Right off the bat I have to say…please, don’t feel bad. Clearly this post illustrates that it can happen to anyone: the ability to lock inside or lose that almighty garage door opener, to then be completely locked out and desperately separated from your stuff (or, God forbid, your way to work)!
How it happened:
It happened to us just recently. We had only one other way into our garage: a decrepit, hard-to-close, peek-a-boo windowed back door (with a large doggie door most adults could access), that we had ironically, the week before, replaced with a super solid, well-hung, windowless one that was both kick-in and case-the-joint proof…and it had TWO locks!
The problem with this was that we had reinstalled the same door knob and lock (to save money), but we’ve never had a key to it (we never needed one – the big doggie door was our old fail-safe way in – sheesh). Oh, and the inside lock is one of those slide bolt latches that can only be opened from the inside.
What we also hadn’t planned for was how we’d get back in if the power had gone off or if one of us (eh-hem…Matthew?) had accidentally left the one and only opener inside the garage while pushing the close button, then running out before the door closed (yeah, we’ve all played that game, right?). I digress.
Working the problem:
With a little surfing around the net (do people still say that?), and calling lock smiths, Home Depot and local handymen, we soon realized the cost to have someone come out to drill out and replace the lock (around $100) was more than we wanted to pay. (Besides the fact that a new lock wouldn’t have helped due to our inaccessible-to-the-outside slide latch-ah jeez!)
The SOLUTION!
Hopping back on the computer with even more resolve, I soon discovered the Chamberlain Outside Quick Release Lock. It’s purpose is to be installed onto the front of the garage door, with an inner cable that extends and is hooked onto the trolly release arm of the garage opener unit. (see Chamberlain Quick Release Key manual-PDF).
Great. But now what? We couldn’t get inside to install the cable…BUT…we did have the manual specs that had instructions on where to drill holes so we could possibly “fish”, and ultimately hook the automatic door opener’s release handle (then later install the lock and cable)! To make things super easy, here’s how we opened our garage door…you can, too!!!
How to Open a Garage When You’ve Lost (or locked inside) the Opener:
Supplies:
• Chamberlain Outside Quick Release Lock

• Chamberlain Quick Release Key manual template (see manual PDF above and print)
• 3/4″ and 1/4″ drill bit (appropriate for drilling through metal)
• one 4′ long, 5/8″ diameter wooden dowel (4′ long is plenty – our release handle was only 17″ from the door)
• screw-in hook (be sure the curved end is about 5/8″ wide – the same as your dowel diameter)
• optional: string of lights
Tools:
• Drill

All the different fishing devices…the long dowel on the right was the winner (although, it could have been half as long).
Instructions:
Step #1: tape the template to your garage door. The manual says it should be 20 -30 inches below the top of the door, but that didn’t make any sense in our case. Our automatic garage door release handle was located/mounted near the top-end of the door, so we placed it only 7″ from the top. Note: this is one of the more important steps – if you drill these holes too low or too high, it might be difficult grab the release handle.
Step #2: carefully drill your holes. Be sure to drill straight in, so that both holes (the front panel of your garage door as well as the second inner panel) are even front to back. Note: one trick is to place a level on top of your drill (some drills come with this handy feature), then you’ll have a good, level starting point.

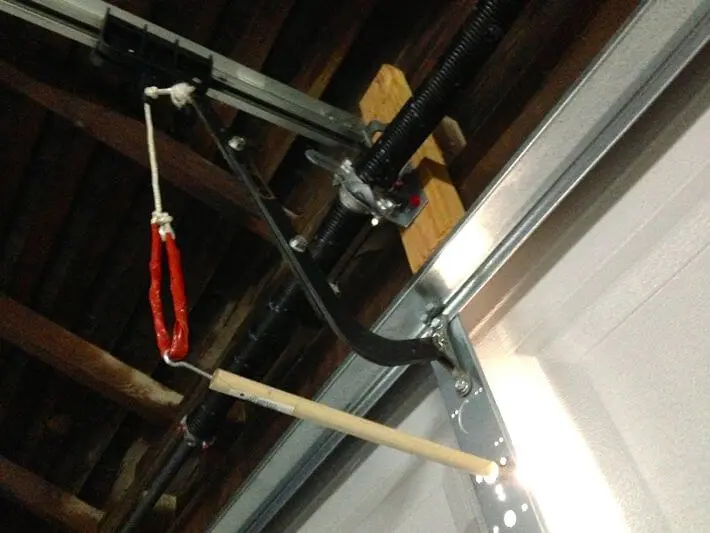
Step #3: after screwing in the hook into the end of your dowel, fish it through the hole and hook the release handle…and gently pull. You won’t need to yank it – it’s designed to release fairly easily. Once I had the handle hooked, it took just a couple of tries and voila! We easily and manually slid open the door. Yes! It was open!!!


Optional steps (and disclosure)
If your garage has no windows and you’ve tried and tried to fish and hook the release handle with no success, you might have to go a couple steps further. We had tried, but just couldn’t “see” the hook. Luckily, our garage had a hole on the adjacent wall (where old electrical or television cables once ran through). We also had a little space under the garage door where we could push a string of Christmas lights through for a little illumination. Note: this is actually easier to do at night, if you need to try this method. Here’s what we did…
Step #4: push a string of Christmas/holiday lights under your door to light the space – (you might be able to find a space under the door by pulling up on its handle, or sometimes there’s even space between the segments of the door, or even at the top end of your door). Try everything!


Step #5: if there is no hole on the adjacent wall, you may need to drill a small one (1/4″ even) towards the top of the wall. Don’t worry too much about this…you can always fill it later with Great Stuff Gaps and Cracks (around $4 a can).
Step #6: have someone peek through to help guide you to hooking the handle. Gently pull…Done!


Yes, this was definitely a hairy method. Lots could have gone wrong. But we stayed the course, kept our heads, and succeeded! Let us know if you tried this method or if you have any other ideas to opening an automatic garage door without the opener. It’s amazing how often this happens and how crazy difficult it is to get back in…until now!

Note: for those of you stumbling across this post with the ability to get INTO your garage door now, you may want to either get a back-up garage door opener, have one of those auto door key-access mechanisms installed, or put in a quick release key. We were not paid or sponsored by Chamberlain (nor Home Depot), by the way…although, we should have!

All photography by Skaie Knox, HomeJelly
This post contains affiliate links to the tools and supplies we used in this project. This means we will receive a percentage of the sale if you make a purchase using these links which helps keep our lights on and able to provide free how-to posts like this one.