
Living room and all our stuff.
That’s right. I just compared inventorying your home’s possessions to Mexican food. Why not? This past week, I was fortunate to be introduced to Homezada‘s intuitive and easy-to-navigate home management software and site that allows users to list and account for everything they own in their homes. How delicious and spicy is that?
Now, we at HomeJelly are a tad bit snooty when it comes to tech. After all, our developer nerds (and…admittedly, I) pride ourselves on keeping up with the latest and greatest apps and websites that are user friendly, intuitive and most importantly, useful. Because Homezada ticks all these boxes, I thought it would be fun to take you through a very simple step-by-step walk-through of their Home Inventory feature…just in time for tax time!
Step #1-Getting Started

HomeZada Get Started page.
Once I signed up for the free membership, I clicked on “Get Started” and was taken to this page above. Note: typically, I prefer to have a look around before giving out my information, but because of all the explainer videos, I was able to see this was a club I wanted in! There are loads of ways to use Homezada, and today, I chose to check out the home inventory feature. I like to personalize my profiles, so I selected “Start personalizing it here,” and proceeded to the next step.
Step #2: All Spaces – Adding the details…

All Spaces-items in each room.
To scale down and tell the software what type of home I live in, I first added the specifics like number of rooms, bathrooms, square footage, property type, etc. I was then offered a set amount of rooms with items already ready for me to identify and add photos to, which I could easily and intuitively edit, change, or delete at any time. Again, I’m a stickler for ease-of-use, and I had no problem figuring out how to navigate this site…whoo-hoo!
Step 3: Living Room – Tagging and Adding Photos

Living room itemizing with photos, value, and purchase date.
I was off to the races now! The first room I wanted to tackle was our living room. As you can see, because I had entered the number of rooms and square footage of my home, the Homezada software was able to pre-designate the type of furniture I might have in this space. We don’t own a coffee table, but it was totally easy to click in, then change the item to an ottoman (which we use as a coffee table and comfy foot rest).
I was excited to have my things itemized so thoroughly, because according to State Farm, “Your home inventory should support the claims process for events ranging from the total loss of your home by fire to the theft of a few items. That’s why it’s important to thoroughly document your belongings to ensure proper coverage.” Here’s how I itemized our sofa…
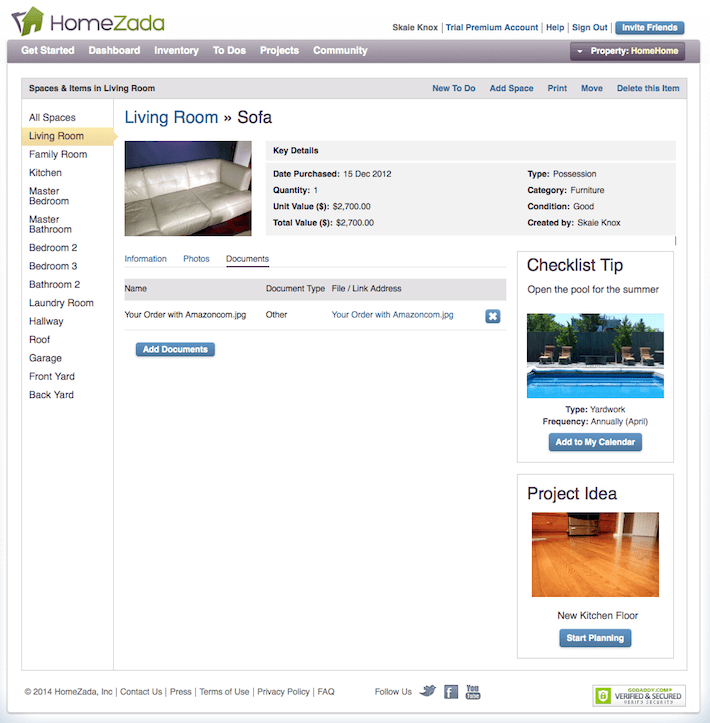
Step #4: Sofa – Tagging and adding photographs and documents

Item information. The more thorough, the better chance of coverage by your insurance company.

Sofa item for living room space. I was able to upload several images showing its excellent condition and value.

Item documents. A great way to keep important paper work safe and easily accessible.
Once you’re on the individual items page, you have three ways to identify your stuff: information, photos, and documents. Note: to document all your important things, it will take time. A good tip is to take it room by room, maybe designate a couple per day (or weekend day) and use the Homezada free mobile app to make uploading photos a snap (yup, I just did that).
State Farm also suggests, “Keeping proper documentation will also help to facilitate the claims process. This documentation, which can be scanned for digital storage, includes:
• Receipts
• Credit card statements
• Other transaction documents
• Appraisals (include the appraiser’s name and address)
Once you’ve created your home inventory, make sure to update it as you acquire or get rid of items over time.”
Step #5: Continue itemizing and utilize Homezada’s handy tips

Living room items and great tips
It was easy to find my groove, especially because I had photos of most of the items I wanted to list. Still, there will be areas of our home that I haven’t photographed, so using the handy tips to facilitate this process will make things much easier. I was just so thrilled to finally have a tool that was so thorough and easy to use. Check it out yourself and then let us know what you think!
Homezada has two price options: (1) Essentials is FREE and, (2) Premium which is $5.95 p/month or $59.00 p/year.
Have you tried Homezada? What do you think?