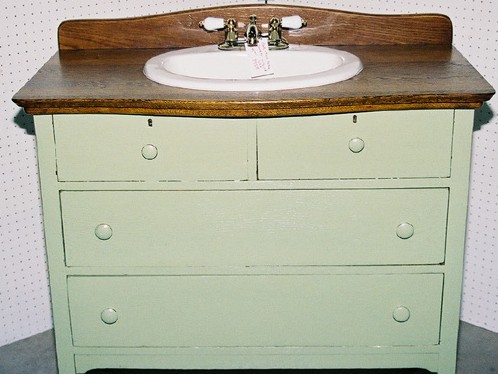

I was delighted to learn about a fantastic quick-tip from this past week’s rerun of HGTV’s “sarah’s house” (season 2’s episode: “High/Low Bathrooms“) where host/designer/GC Sarah Richardson deftly walks us through the simple conversion of an old dresser drawer into a fabulous bathroom vanity. Not only can you create a custom piece for half the price of a box store manufactured product, but there are so many more options that can work inside your budget. With Sarah’s advice, we can learn the ABC’s of how to make this project happen:
A. Measure vanity space: When installing a custom vanity, it is vital to measure the area you wish to use, so you know what size to look for and insure it will fit into your designated space. Quick-Note: Saves time, hassle, and money.
B. Locate a dresser drawer (as well as sink(s) and fixtures): you can find these items as close as DiggersList, Habitat for Humanity Restores, your grandparents house, thrift or antique stores, or, even a garage sale. Quick-Note: great thing about DiggersList or ReStores, you can see what’s available online, then contact and bargain with the seller for the best price possible.
C. Choose a counter-top material: finding remnants of marble or granite is a great way to save money. Quick-Note: ask the seller about their “bone yard” of scraps and remnants for the best bargains.
D. Cut out opening for sink(s) & fixtures: openings should be measured and cut for both the counter-top and dresser (unless you remove the dresser’s top altogether, eliminating this step) to house the basin(s) and fixtures. Quick-Note: This step in the process is best left to a custom cabinet or carpentry pro (unless you are already a pro in cutting marble or stone).
E. Attach counter-top & fixtures: using a strong adhesive for the top and connecting the fixtures will finish the job. Quick-Note: The use and availability of drawers will depend on the original design of your dresser and how many sinks you install. Connecting sink fixtures can be tricky, so consult or hire a plumber or handyman if needed.
F. Finish with custom details: paint, knobs, and shelving are only limited by your imagination and/or existing color scheme (i.e. bathroom tile). Quick-Note: be creative and consider “open shelving” for towels and toiletries as well as using other furniture to convert like old desks, tables, or sideboards.
For more detailed step by step “how to” directions check out factoid.com.