
Before and after.
There are times when home improvement requires a person to have finesse, fine craftsmanship, and expertise. Then, there are the projects that just need a “Get ‘er done!” attitude and someone with enough mindfulness and DIY creativity to finish the job. Well, that’s just what we did last weekend when we attempted and successfully repaired a window ledge that was seemingly unrepairable.
Now, this wasn’t our first time, mind you. On a recent post, Curb Appeal Makeover for the Ugliest House on the Block, we restored an even worse-looking window ledge. Our neighbor Mark, smartly suggested we “MacGyver it”, so we did. Enter the can of bondo. We definitely had readers responding with comments like “Gee, I’m not the only one who has tried this trick? Is it even legit?” Our response: “why not?” The purpose of using bondo is almost always cosmetic and basically a short-term solution. If you’re like us and rent, this is a cost-effective quick-fix. If you own and are in a financially hands-tied situation, but wish to upkeep the aesthetics of your home, again…why not?
Here’s what you’ll need:

Window ledge tools and supplies. (some supplies not shown)
- hand brush (regular and wire)
- putty knife
- mixing stick or knife
- paint scraper
- hand sander
- sanding block
- sandpaper
- bondo & hardener
- wood/paint patch
- paint brush
- paint
- safety glasses and/or goggles
- paper breathing mask
Here’s what you do:

Brush off ledge.
1. Brush off ledge: be sure all surfaces are clear of dirt, old paint chips, and other outdoor debris.

Scrape ledge and window frame.
2. Scrape ledge and window frame: carefully scrape the old, weathered paint off the ledge. For us, we also finished the window frame. Note: be sure not to scrape too hard as you may dig into the damaged wood ledge, creating an “opened can of worms” situation. It may be hard to resist, but work on the loose, cracked, and peeling paint only.

Sand ledge.
3. Sand the ledge: here, Matt uses the power hand sander to even out the scraped paint and remaining wood ledge. The smoother the surface now, the nicer the end results.

Bondo and hardener.

Prepping the bondo and hardener.
4. Prep the bondo: in a small container, pour the bondo and hardener (for a golf ball sized amount of bondo filler, squeeze approximately 1 1/4 inch of red cream hardener) and quickly mix together. Note: only mix a small amount at a time, as it hardens within a couple minutes. For more information, follow the directions on the can.

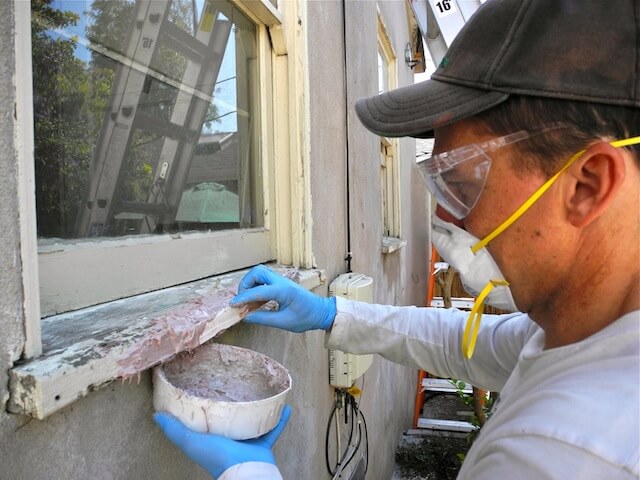
Matt bondos ledge.
5. Apply bondo: Work quickly and apply in parts-don’t try bondoing the entire ledge all at once. It might look absolutely sloppy, but don’t worry. Try and fill in any holes that need extra “shoring up”. Don’t forget the outer lip of the ledge.

Allow bondo to dry.
6. Allow bondo to dry: according to the can, 20-30 minutes is enough drying time. However, because we had such a thick application, we let our window ledge dry for 24 hours to completely cure and harden.

Sand and shape the bondo.

Smooth bondo.
7. Sand and shape the bondo: slowly but surly sand down the craggy surface of the bondo. Soon you’ll be able to start shaping it down to the original surface of the wood. Note: do the best you can to form a straight and even surface, but don’t worry if it’s not perfect…the end results will be far better than the old, crumbling ledge.

Fill in remaining bumps and divots with wood putty patch.
8. Fill in the remaining bumps and divots: using wood putty patch (here, we used “Patch ‘n Putty”) fill in any areas missed or not covered by the bondo. Note: mainly, we used the bondo to fill in really large holes and missing ledge wood. Putty is better for smaller holes and divots, and requires much less prep and hassle.

Hand sand smooth.

Before the paint.
9. Hand sand smooth: allow the wood putty to dry from 1-3 hours (depending on the amount you apply), then gently sand smooth.

Ta-da!
10. Prime, paint and you’re finished: apply one coat of primer, paint, and you’re done. Ta-da!

Klunkers: project manager…approves and is pleased with the end result.
Q. Have you used bondo in your home? Where?
Photographed by Skaie Knox, HomeJelly