
We’ve always been dog people, my husband and I, though recently I’ve discovered my love of birds. Since hanging a bird feeder outside my window, I’ve spent the last couple months observing the very interesting and ever busy goings-on of these fine feathered fledglings. I figured, if one bird feeder attracted this much activity, why not add another feature and double the fun?
So, with that, and recalling a project I had seen online using a glass bowl as a bird bath, I thought I’d do a little kitchen spring cleaning and see what I might find in there. Digging way up into the cupboards, I pulled out a cracked and “oh-I-forgot-I-had-that” serving bowl…perfect! The following weekend, I moseyed on down to the Habitat for Humanity in Garden Grove thinking I’d find some kind of pipe or wood poll I could use as the holder for my serving bowl. Actually, I found something even better: a spindle table leg for just $2.00!
Excitedly, I returned home, and after looking at the supplies and tools list, I was thrilled that this project would cost me just about $5.00 total! Luckily, I already had the tools, most of the supplies and serving bowl. I just needed some glue ($2.49) and the table leg ($2.00). At this point, I was ready to go. Soon the pool would be open.
Here’s what you need:

• hacksaw
• clamp
• sand paper & block
• ruler
• serving bowl
• scrap wood piece
• table leg
• drill
• paint and brush (optional)
• screw
• drift wood piece or branch (optional)
Here’s what you do:

1. Prep table leg: using a hacksaw, remove the small insert peg at the top of the leg. Sand it down so that it is flat and even.

2. Drill center of table leg: be sure to find the center of your table leg, then drill a hole making sure to go in straight.

3. Prep stabilizing piece: find any scrap wood and, if necessary, cut and sand it to fit the bottom of your serving bowl (it doesn’t need to be perfect nor round). Optional: paint the bottom of the piece (the side that will be showing) a simple coat of white (or whatever color your bowl is), to give it that extra attention to detail.

4. Drill center of stabilizing piece: using a ruler and pencil, find the center of your scrap wood piece, then drill a hole all the way through.


5. Screw base and table leg together: using the clamp, screw together the wood piece and the table leg to complete your bird bath base.

6. Find the bowl’s center: to insure the bird bath is stable, use your ruler to find the center of the bowl.

7. Glue the base and bowl together: using a generous amount of glue (I used Liquid Nails), apply to the base, then place it onto the center of the bottom of the bowl. Note: to insure a good, solid hold, immediately remove the base and let the glue cure for about 1-3 minutes. Then replace the base to the bottom of the bowl.

8. Attach perch (optional): glue the perch onto the side of the bowl and be sure to place a brick or something to hold it in place. Allow at least 2-3 hours to dry. Note: you can do this before or after you glue the bowl to the base. I did it beforehand.

9. Allow to dry: give your new bird bath about 24 hours of drying time. All done! Just place anywhere in your garden, preferably where you can observe the birdies, fill with water, and enjoy endless hours of feathered fun!

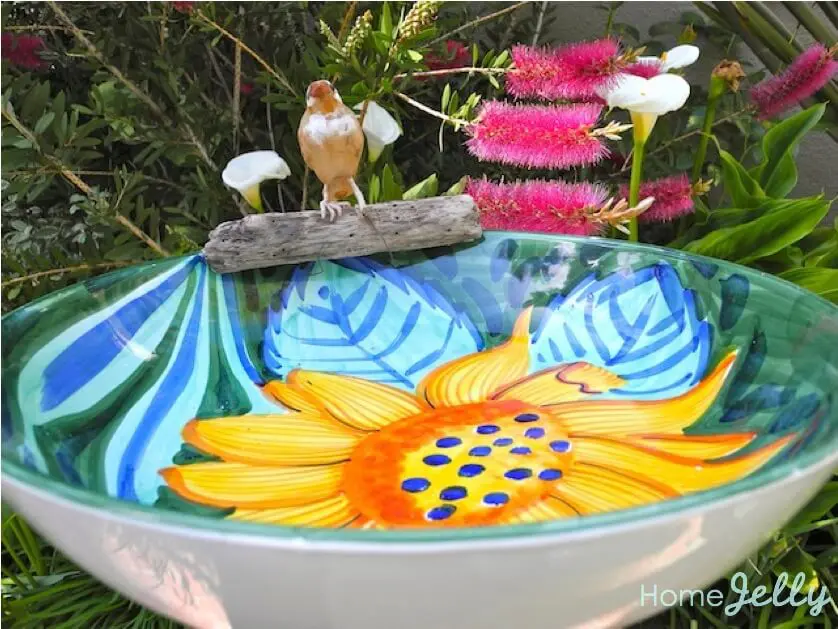
Bird bath complete! The prettiness of the serving bowl and finished table leg adds a posh and expensive-looking garden decor.
Updated Tip! If you find that you have problems with algae in the hot weather, add a few copper pennies or a chunk of copper pipe (must be real 100% copper). The water will stay clear. –Thanks to HomeJelly reader, Rhana Thomson for this handy suggestion!

This bird bath in the garden is already inviting birds to take a plunge!
Not bad for $5.00! We’d like to say “thank you!” to all the Habitat for Humanity ReStores for your fantastic finds (a special shout-out to the Garden Grove ReStore). View some of the current items for sale (typically, 50% less than retail) at their DiggersList storefront. Click in to find a Habitat for Humanity ReStore in your area. If you have completed this project, or one you’ve done on the cheap, write in and tell us about it! Email us at: [email protected]
Photography by Skaie Knox, HomeJelly