
Birdie Dreamcatcher.
If you search “dreamcatcher” on Pinterest, you’ll find there are, like fingerprints, no two alike. So, since my husband and his side of the family all hail from Tucson, Arizona, I thought I’d pay homage to them by attempting to make my own. But first, I thought I’d gain a little insight into their history.
Inspired by the way they web their snow shoes, the Ojibway (Chippewa) tribes people created dreamcatchers by tying sinew strands in a web around a small round or tear-shaped frame. Their belief was that bad dreams would get caught inside, allowing the dreamer to enjoy a peaceful night’s sleep. The beads and feathers that hang down below the web represent good dreams – the feathers create a soft spot for the dreams to land.
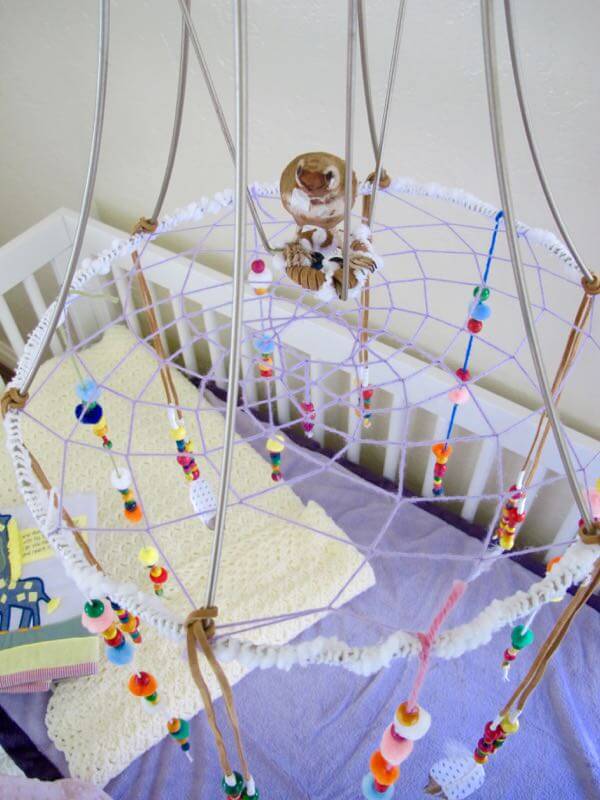
Before I start any project, I first think about how I might be able to reuse, repurpose or upcycle an item/material I have or can find. I originally created this deconstructed glammed-up lamp a couple years ago. Since its glittery appeal had run its course, I decided to reuse the lampshade frame into today’s dreamcatcher for a baby – besides the obvious benefit to tired parents, the above-the-crib visual stimulation was an added bonus.
At first, I thought I could create a double-duty dreamcatcher lamp, then realized the bulb would hang down into the web. No worries! I came up with something even better…which can happen when you dream big!
Supplies:

Dreamcatcher supplies.
• a frame – lampshade frames, embroidery hoops, pliable branches, metal hoops, metal hangers, etc.
• an assortment of yarn
• craft glue
• scissors
• embroidery thread
• sewing needle
• leather cording and/or sinew
• an assortment of crafty accoutrements – beads, pom-poms, feathers
Optional:
• paint and brushes – for feathers
• wooden or plastic figure
Instructions:
1. Spray paint your frame. This is especially for lampshade frames, or any other type of frame that will not be covered or that has a color you wish to change. Allow to dry.

Spray lampshade frame with whatever color you wish/
2. Glue along the edge of your frame, then wrap yarn as you go. If you are using sinew or leather, you can choose not to add glue, or only every so often along the edge.

Glue then wrap yarn around rim of lampshade frame.
3. Begin tying your web. There are numerous ways to tie webbing. I used this dreamcatcher video tutorial by Sea Lemon and modified mine to work with the frame I had.

Tie your yarn dreamcatcher.
4. Create your hanging beads. Again, there are so many variations on beading and materials…go nuts! Use your creativity! I simply cut varying lengths of leather (found at Michaels), then wrapped the ends with white embroidery thread. I then strung numerous beads and pushed them up against the leather, then tied them off. I also did this with varying lengths and color of yarn.

Wrap leather with embroidery thread, then add beads.
5. Attach your feathers. As you thread your beads, choose to add feathers to some of them. Instead of tying off the end of your beads, first thread your needle into the end of the feather’s quill. To finish, poke the end of the quill back into the bead, pulling taut, then tie off.

Add feathers to beads by threading through the end, then sticking the end into the beads for nice finish.
6. (Optional) Dip your feather in paint and/or glitter…or glitter paint. This will add pizazz to your dreamcatcher!

Dip the tip of the feather in paint.
Skaie Note: Do a search around the web for more optional ideas to make your dreamcatcher unique. This is what’s so fantastic about DIY…you can do it HOWEVER you want!
7. (Optional) Mimic the feathers dipped in paint and polka dotted. I wanted it to look as if the feathers hanging from my dreamcatcher came from my cute wooden birdie. It was originally unpainted, so…as I always advice y’all…I went nuts! It was super fun to create something magical!

Mimic the real feathers dipped in gold with black polka dots onto wooden bird.
8. (Optional) Create a leather nest. Simply wrap some leather cording around the lampshade’s uno fitter. I also added some of the white yarn to soften its look.

Create a nest by wrapping leather cording around lampshade’s uno fitter.
9. (Optional) Using embroidery thread, attach the bird to its nest.

Finished birdie dreamcatcher for baby.
10. Add some yarn or embroidery thread to the top to hang. You’re DONE!

Baby will love to stare at the colorful beads.

Baby’s view of dreamcatcher.

Colorful wooden beads.

Top view of dreamcatcher.
If you enjoyed this tutorial, please share with a friend!
All photography by Skaie Knox, HomeJelly