
Puppy Grass Patch before and after.
Okay, so, maybe not his BEST friend – Matt and I reserve that place in the heart of our new doggy, Krinkles’ (and…yes! HomeJelly has a new project foreman! More to come on that!). As for his NEXT best friend, we’re hoping that our new install of Synthetic Grass Warehouse’s Diamond Supreme Spring turf will make picking up poops super simple that’s both nice to look at and easy to maintain.
We were very lucky to be offered a sample of this I-can’t-believe-this-isn’t-real-grass product to create what we’ve always wanted, a designated “puppy pooping patch”. Moreover, as a tribute to Klunkers, we wanted to create a “Klunkers’ Korner” (which, we’re now dubbing “Krinkles’ Korner”) using artificial grass for our next fur babies, as well as visiting doggies as well.
We have a larger yard further back on our property, but, because of Klunkers’ Degenerative Myelopathy, he was only able to walk so far to relieve himself (ultimately, we had to use a “help-me-up” harness to take him to this spot). As indicative of the “before” photo above, the grass was totally dead, due to his urine (and the reason we thought of replacing this dead grass with an artificial product).
As we researched more about “planting” this faux lawn, we discovered some additional benefits:
#1. Saves Water: Artificial turf requires NO watering. With California’s first mandatory water restrictions now in affect, more and more residents are looking for ways to conserve. The EPA notes that a typical household’s landscaping water use can account for one-third of all residential usage. No matter how much (or, in our case, how little) natural grass you replace with artificial, the savings can be quite significant. According to The Sacramento Bee, “…a healthy grass lawn typically requires 55 gallons of water per square foot per year.”
Our new “puppy patch” is 72 square feet. Doing the math, we should save approximately 3,960 gallons per year! That’s a whole lotta H2O (and dollar savings), my friends! You’re welcome, City of Manhattan Beach and California!
#2. No Pesticides: fertilizers and weed killers are killers to the water table via runoff. And, being so close to the ocean, that’s a big benny for us and mom nature!
#3. No Noxious Emissions (let alone annoying Saturday morning noise!): motorized mowers create noise pollution and noxious emissions that invade our ears and lungs, not to mention our precious ozone layer that’s holding on for dear life. What’s more, as stated by the EPA, a push lawnmower pollutes the air equivalent to 11 cars traveling on the road.
#4 Rebates! Now you’re talk’n! Who doesn’t love an incentive? For now, there are only select regions across the country offering rebates, but you should contact your city planning department and/or read SGW’s article on rebates for more information.

Krinkles loves his artificial turf by SGW.
Now…on to the artificial grass install!
Matt and I initially educated ourselves on how to install SGW’s artificial turf by watching their how-to videos. We then, as per our usual, took a dash of creative license and DIY’d it with these 8 easy steps (which took us a total of 9 hours to complete…basically, a fairly easy weekend):
Step #1 – Clear the Space: that includes weeds, debris, rocks, and old sod – a shovel, rake and getting our hands dirty cleared this small space within an hour. Next, install your bender board to create a clean edge for your turf.

Clear the space of weeds, rocks, old sod and other debris.
Note: you’ll also need to carefully move existing irrigation, pipes and electrical wires inward and away from the hardscape or perimeter by 6-8” (so not to damage when nailing or tucking in turf). Keep at subgrade surface, then secure with “U” nails. Additionally, cap off existing sprinklers below the surface to avoid leakage.

Krinkles, on his first job as project foreman, checks electrical wires.

Pull electrical wires back from edging, then secure with “U” nails.

Install bender board.
Step #2 – Base Preparation: lay down a foundation of gravel and decomposed granite mix, then distribute and level it away from your home and towards the soon-to-be drainage system (this will insure proper drainage and a smooth look to your lawn). When we cleared our space, we also dug down a couple inches below our brick edging to make way for the gravel/DG mix and allow for the 1/2” drainage membrane.

Lay down gravel and DG for base.

Distribute base and make surface level.
Step #3 – Compact the Base: water the entire surface, then compact the gravel/DG. We used good ol’ man-power and used a hand-made tamper which did the trick!

Water area to help settle foundation.

Tamp and compact foundation.

Tamping corners and edges using a different method – wood and hammer.
A fun note…the stacked wood tamper above was a deconstructed piece from Klunkers’ repurposed pallet doggie ramp. Its third life! And yes, Klunkers is still and always with us.

Krinkles helps with “tamping”.
Step #4 – Lay Down Drainage Membrane: (A.) apply the ATD (artificial turf deodorizer) – this sandy substance neutralizes the ammonia in pet urine and reduces odor. We used a seed spreader for this step…easy! (B.) install the membrane, dimples up which will provide aeration and drainage.

Before the drainage membrane we applied the Zeo Fill ATD using a seed spreader.

Cut drainage membrane to fit space using an exacto knife.

Use “U” nails to secure drainage membrane.

Hammer “U” nails flush with a painter’s multi-tool.

Artificial turf progress…drainage membrane complete.
Step #5 – Lay Out Turf: (A.) square off the turf and secure in place with temporary nails, then (B.) using an exacto knife, trim along your edging (allowing for about an 1/8 of an inch for tucking into place). (C.) Hammer in 6” nails 3/4 of the way down, first. To finish, (D.) separate the grass blades (to avoid pulling down the turf along with the nail), then hammer down the nail flush to the base so it is hidden underneath the blades.

When first installing grass, square to edge, then secure with temporary nails.

Use exacto knife to cut grass leaving 1/8 inch for tucking.

Spread blades before nailing 6″ nails flush to the base.

Use “U” nails to adjoin seams.

Almost finished, but Krinkles already LOVES his new grass!
Step #6 – Tuck the Turf: tuck the turf into your edges. We used a hammer and crowbar…easy-peasy!

Tuck grass into the edges.
Step #7 – Apply the Filler: (A.) brush the grass against its grain to make it stand up (we used a regular push brush), then (B.) apply a second layer of the ATD directly onto the turf. Next, (C.) apply the anti-bacterial Durafill Sand (which is safe for people and pets) – this will also give the turf more weight.

Finish grooming grass and distribute the 2nd layer of ATD and first layer of Durafill sand.

Apply the Durafill sand.
Step #8 – Final Groom: simply brush, then rake the turf to make it look pretty…and you’re done!

Rake the grass to make it look pretty and spiffy!
Maintenance: Turf Fresh Odor Eliminator should be applied occasionally (see bottle for exact schedule) to keep your faux lawn fresh and well-maintained!

Turf Fresh Odor Eliminator should be applied occasionally to keep your new grass smelling nice – see bottle for exact schedule.
The Results!
Krinkles was initially curious about his new lawn…his response? Not only did it pass “muttsterd”, he visits it whenever nature calls…just like a best friend should (see video at the bottom of the page!).

Krinkles’ Korner (aka puppy patch) After!

“Gus” the goldfish lawn ornament and Krinkles.
It was so fun and easy to make over this whimsical spitting goldfish lawn ornament…Krinkles thinks he’s “adorbs”!

Synthetic Grass Warehouse’s Diamond Supreme Spring turf is dog-friendly!

Synthetic Grass Warehouse’s Diamond Supreme Spring turf close-up – so real-looking!

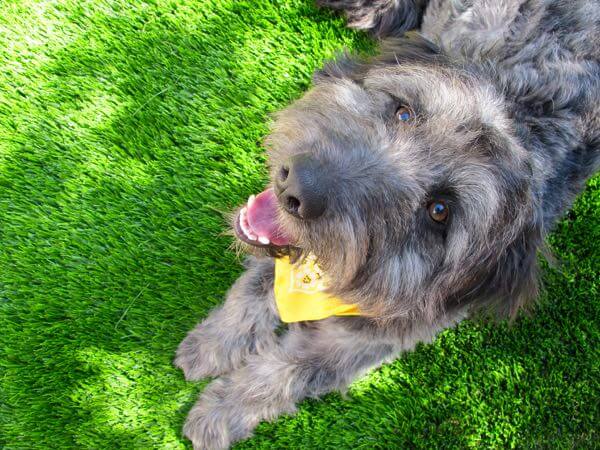
Krinkles’ next best friend!
This is a sponsored post brought to you by:
![]()
The opinions are completely my own based on my experience.
All photography by Skaie Knox, HomeJelly