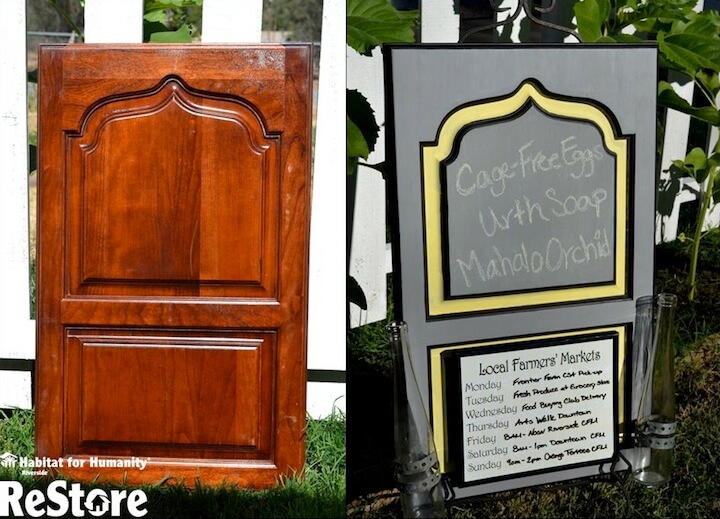

Repurposed cabinet turned shopping list, Before & After.
I’m lucky. Our nearby farmers’ markets offer fresh produce every day, so now I have become a Locavore. What is a Locavore you ask? As defined by Webster, a Locavore is “one who eats locally whenever possible.” This noble ambition conflicts with our culture of convenience due to the fact that local means locally grown and not the fast food joint down the street. Because of the nomadic nature of farmers’ markets, buying Community Supported Agriculture (CSA)) takes planning. When it comes to doing the something that’s worth the effort, you have to start somewhere, right? So, I started with today’s repurposing project: a Locavore chalkboard.
Here’s what you’ll need:
- cabinet door
- sand paper (60 or 80 depending on the thickness of varnish you need to remove, and fine girt 220 for finishing)
- sanding block and/or electric hand sander
- paint and brushes
- chalkboard paint or Martha Stewart’s custom color chalkboard paint recipe
- framed piece of glass
- hanging hardware
- screwdriver
- chalk and whiteboard marker
Optional vase embellishment:
- vases
- screwdriver and screws
- metal fasteners
- hose clamps
- 2 L-brackets

Repurposed cabinet paint prep.
I chose this cabinet door because I loved the Moroccan-style inlay design. In fact, I loved it so much that I ignored my distaste of sanding off varnish. I googled a few varnish removal tips, all of which involved caustic chemicals or hours of sanding, and decided to simply test my paint directly over the stain (on the back of the cabinet). Will wonders never cease? It took!
I knew I wanted gray, black and yellow, but I wasn’t sure which combination would be both aesthetically pleasing and writable. Also, the main color would become my chalkboard paint (See below for Martha’s DIY chalkboard paint recipe that allows you to create any color you want!). So I turned to our dear friend Pinterest to see if gray framing yellow or yellow framing gray would be more striking. Hours later I tore myself away from pinning and got started.
Here’s what you do:
1. Sand the cabinet face. I decided not to be completely lazy and lightly sanded the cabinet’s face – with my electric sander. I quickly sanded the inlay by hand with the finest grit I happen to have in my toolbox, 220 it is!
2. Choose your cabinet’s paint scheme. I had Behr paint samples from a different project (for which I bought all the supplies but never found the gumption). The yellow is called Chilled Lemonade and the gray is called Anonymous. The black was the result of me asking the paint department to please mix me a really black black, please.

Successfully “cooking up” Martha Stewart’s DIY pick-your-color chalkboard paint recipe.
3. Paint the cabinet. Having learned from previous adventures in repurposing I started with the tedious trim/detail painting. I recommend this for the sake of your patience and your project. Using pre- or custom-made chalkboard paint, apply to the top portion of your board to use as a shopping list or for memos. Also, when your head starts to hurt, take a break and open that window you forgot about.
Note: regarding the Martha Stewart DIY paint recipe, here are some ReStore tips:
- This recipe is for 1 cup of paint, which is the exact same amount as an 8oz paint sample from the home improvement store!
- Habitat ReStores almost always have bags of grout for just a few dollars. I picked mine up for $2.50 on sale at the Riverside ReStore.
- Grout often comes in neutral colors. I chose ’Sand’ because I figured it would work for light chalkboard paint as well as dark. I mixed it in with gray and could not see any difference.
- Use a dry paintbrush to remove the chalk residue from your newly, painstakingly, painted edges.

Cabinet framed whiteboard.
4. Mount glass frame. Secure framed glass to the bottom panel of your cabinet door with screws. The great thing about glass is, you can use a whiteboard marker to write, erase, and rewrite anything you wish.
5. Insert your chosen template. I wanted a non-erasable calendar to place behind my whiteboard so that I could use it as a local food resource from week to week. I couldn’t find a template worthy of my efforts so I created one using a font that worked well the cabinet’s Moroccan design on Publisher. For those of you less nutty “attention-to-detailers”, you can simply hand-print a permanent schedule (or anything you wish) onto a piece of scrapbook paper, then slip it under the glass.
Optional vase embellishment…
6. Attach the vase. Wrap a hose clamp in a spiral around the handle of a screwdriver to shape each vase holster.
7. Secure vase holster. Place each holster onto the cabinet securing them with an L-bracket on top, using a wood screw. Note: the L-bracket serves as a weight-bearing shelf for each vase; therefore, the holster needs only to keep them upright.
8. Hang or display your erasable shopping to-do list. I chose a wrought iron A-frame display stand, but you could easily install picture frame mounts for wall hanging.
Optional Accessories: if you’d rather go more utilitarian, instead of vases, you could attach small jars or miniature milk pails for holding erasers, chalk and markers.
No more excuses. The next time I want to eat fresh, healthy and sustainable food while supporting local farmers, businesses and agriculture, I just have to check the schedule and shopping list on my Locavore chalkboard, grab my reusable shopping bags and go! It’s an amazing experience to eat a delicious peach and thank the person who grew it!
All photos and repurposing project submitted by our friends at:
 For more information please email our repurpose team at [email protected]