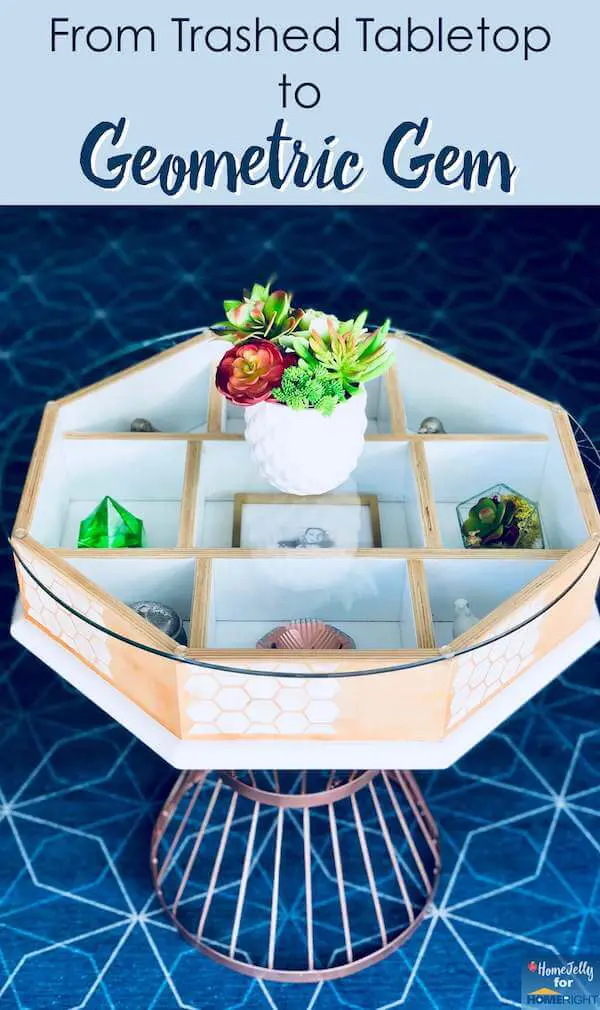
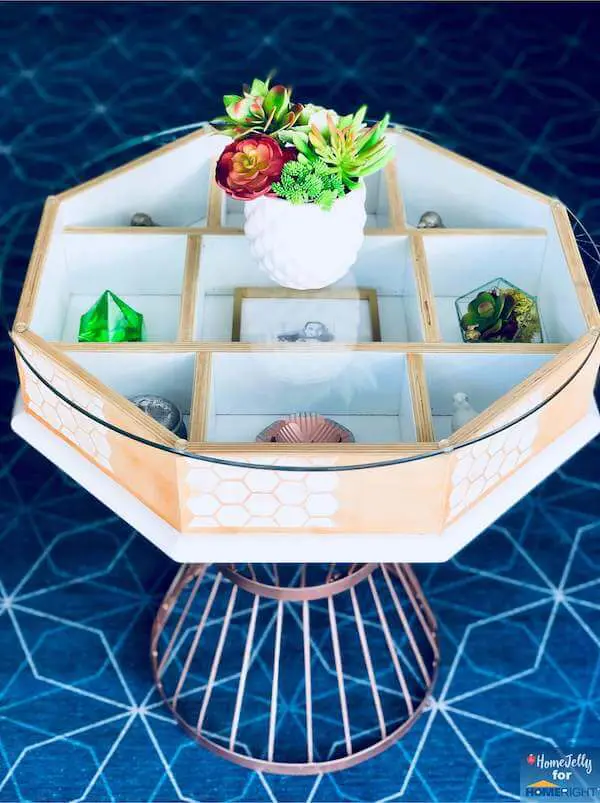
It’s amazing what a little DIY love can do to a previous piece of trash. Here, we see this geometric gem styled with keepsakes and topped with a faux succulent arrangement. Rug by ruggable.com.
This is a sponsored post and contains affiliate links.
There’s nothing quite like a rescue story. Of course, people and animals are at the very top of my list, but a close third is furniture.
I have mentioned that I’m a total decor nerd, haven’t I? (sigh…)
Well, earlier this summer, I was introduced to this diamond in the rough.
Well, actually, more like an octagon in the rough.
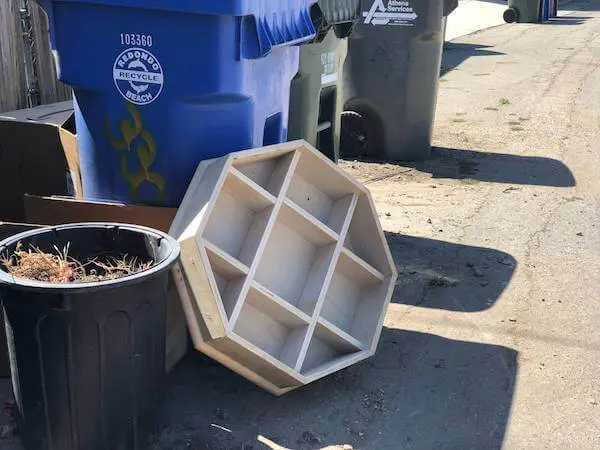
Tabletop trash, diamond in the rough.
It was discovered by a friend of mine who had previously asked me to makeover a tired Ikea table which turned into this beautiful, WOW-upcycled statement piece above! The tabletop was heading towards certain dumpster death, so she snatched it up quick and handed it off to me. Hurray! DIY to the rescue!
Watch this Trashed Tabletop Makeover!
[mv_video key=”d9qvfdw9qnuzmehxk6pp” sticky volume=”70″ aspectRatio=”16:9″ title=”Trashed Tabletop Makeover Goes from Garbage to Geometric Gem” thumbnail=”https://mediavine-res.cloudinary.com/video/upload/d9qvfdw9qnuzmehxk6pp.jpg”]
And with the help of today’s sponsor, HomeRight and their fabulous Medium Spray Shelter and Finish Max Extra Paint Sprayer, I was able to give this forgotten furniture piece a fresh new coat of paint and a new lease on life! You can read my article, “5 Ways the HomeRight Medium Spray Shelter Changed My DIY Life” on their blog – it’s a definite DIY toolbox must-have!
BTW, thanks to this table’s interesting underside, my friend and I thought it would make for a better top where you can display collectables, photos and seasonal trinkets…flipp’n fun! Before I did one thing, though, I did some inspiration research and fell in love with these designs:
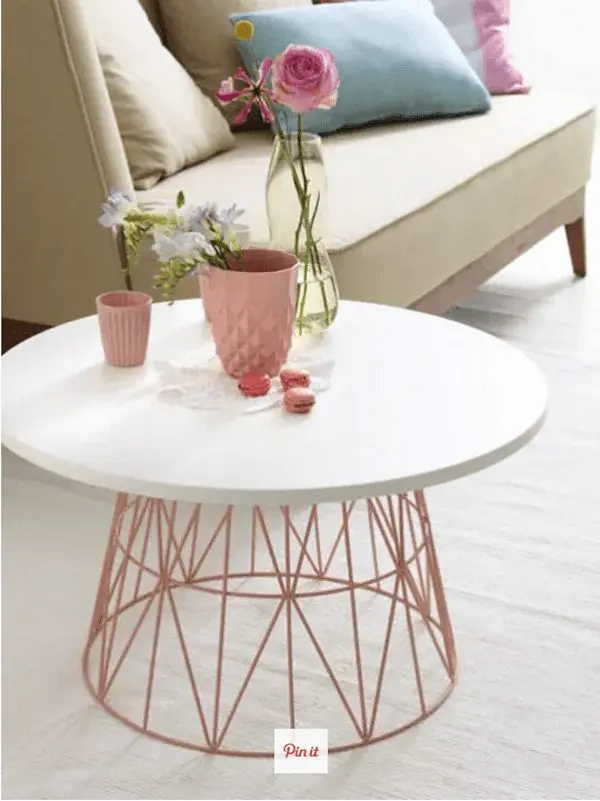
This beautiful table by Wohnidee was the inspiration for the table base. source: wohnidee.wunderweib.de
I just loved the geometric quality and lightness this offered. It was a perfect solution to an already heavy tabletop.
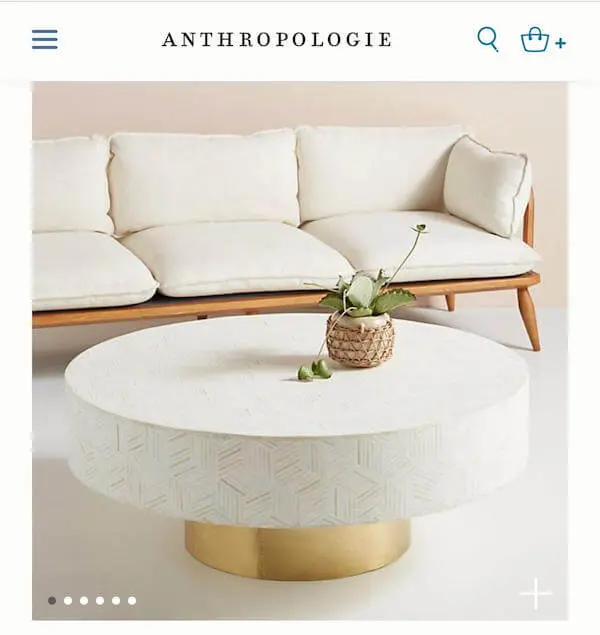
This subtle, yet oh-so elegant painted coffee table gave me the Inspiration for my tabletop stencil design. source: anthropologie.com
I loved the elegant subtleness of this geometric paint design. I thought it would be an unexpected surprise and a way to give a nod to its actual shape. At the last minute, instead of covering the entire table with painted geometric shapes, I only painted the left side edge – I figured “less is more” with this affect.
Here now, is the how-to story of how I made over this trashed tabletop that went from garbage to a geometric gem!
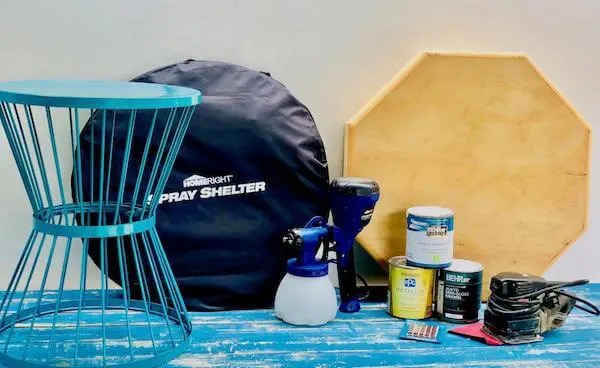
Supplies for made over octagonal table. See below for full supplies list.
Supplies:
• found tabletop
• block and/or hand sander
• P60 and P120 sand paper
• metal rasp
• HomeRight Finish Max Extra Paint Sprayer
• Finish Max Medium Spray Shelter
• metal plant stand (we found ours on sale at Lowe’s)
• paint (we used indoor/outdoor latex and rose gold canned spray paint)
• paint brushes (optional: small paint roller)
• electric drill + drill bits
• (4) 1/4 in.-20 x 1-1/4 in. Phillips Flat-Head Machine Screws (2-Pack)
• (4) stainless steel 1/4″ split locking washers
• 1/4″ tempered round glass table top, 25″ diameter
• 1 pkg. clear plastic bumpers
Optional: HomeRight turn table (the painter’s “lazy Susan”)
Instructions:
1. Clean, then sand all surfaces of tabletop. Often used and found objects need a good cleaning AND sanding, so…grab your cordless friend and tell Alexa to turn on the tunes!
2. Paint metal base. We had a gallon of leftover primer, so we popped up our paint shelter and used the Finish Max sprayer to create a super fine and pro finish. After it dried, we added a beautiful coat of rose gold spray paint for a unique metallic accent for this table. Now it’s ready to be attached to the tabletop once it’s done.
3. Paint tabletop flat bottom and bottom edge. I had a plan to make sure all surfaces were touched and looking good, so I taped off the sides and painted the bottom and rounded edge with semi-gloss white paint.
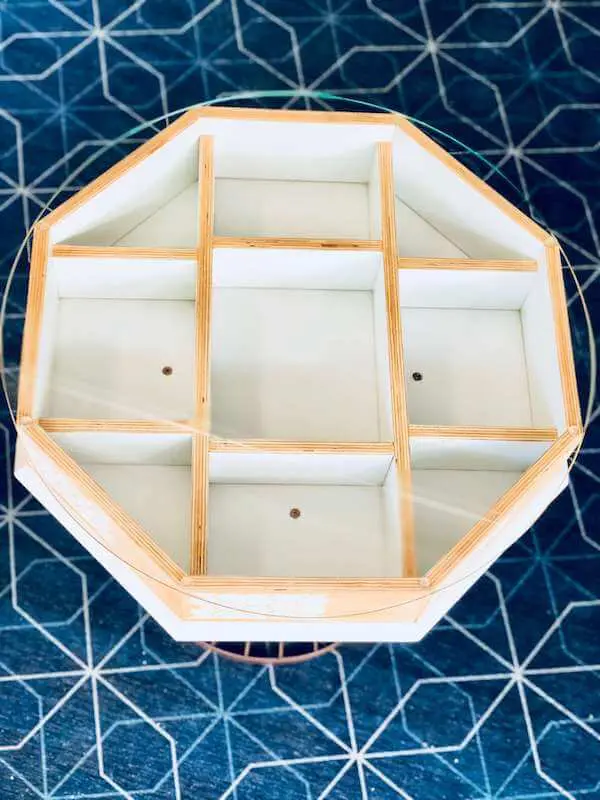
4. Tape off all compartment edges. I wanted to keep this natural wood like the table’s outer surface, so taping was next.
5. Find and mark the center of the tabletop. Before painting the inside of your table, it’s best to mark and drill your attaching hardware holes. Place your base onto your table top and measure so you can place it in the center. Trace around the edges onto the tabletop compartment edges so you can do the next step.
6. Using the center compartment, find the center of each side. This is in preparation for marking your drill holes where you’ll eventually screw in the base.
7. At each center mark, measure out perpendicularly 1 1/4″ then mark drill holes. This doesn’t have to be perfect, but do your best. (You’re now wishing you paid better attention in geometry class, right?)
8. Drill holes. Be sure to use the same diameter sized drill bit as your screws. In this case, it’s a 1/4″ bit.
9. Using a countersink bit, drill to make screws flush to the wood surface. Man! When my Cousin Tom gifted me this countersink bit, it was like the heavens opened up and shown down a brilliant light! Seriously! This 1/2″ bit cost all of $7.25 (though, mine was free! Thanks Tom!) saving me way more money in time! Note: if you’ve never used one (like me), be sure to practice on a scrap piece of wood to get the hang of it. It’s super easy, so it shouldn’t take long.
10. Flip table over, measure to center the base, then tape down and flip back over. We’re now ready to screw the tabletop to the base.
11. Screw holes down through tabletop and base, then sand. Once you’ve drilled holes in the metal base, be sure to use a rasp and sand off any sharp edges. You’ve now prepped the table and base to be attached, but now it’s time to paint!
12. Use newspaper and painters tape to mask off outer wood surface of tabletop. I wanted to keep the wood clear of overspray, so this step was necessary.
13. Place tabletop in spray shelter, then spray inside compartments. Be sure all surfaces are covered. Allow to dry.
14. Stencil geometric pattern onto outer surface of tabletop, then sand to distress. This was where I made an executive DIY decision and stenciled only the left edge of each side of this octagonal piece. I thought it was a bit more unexpected and showed off the edges. Initially, it looked a bit sloppy, as I didn’t use any adhesive to keep the stencil solidly placed (feel free to take that extra step…I was a bit lazy on this one). But, once you sand, the imperfections actually look super unique. NOTE: I want to give a special shout-out to Stencil Revolution for sending me the stencil I used in this project…please, give them a visit!
15. Using a rag, wipe a light stain onto sides and compartment top edges. It’s amazing how far a little stain can go in beautifying wood and paint designs. Allow to dry.
16. Screw down the base from the tabletop down to the base. The screws should easily screw into the wood and down through to the base. Flip over, then add the washers and nuts. Tighten down.
17. Add glass bumpers, style, then add glass tabletop. You’re done!
Makeover Complete!
Finished tabletop top view.
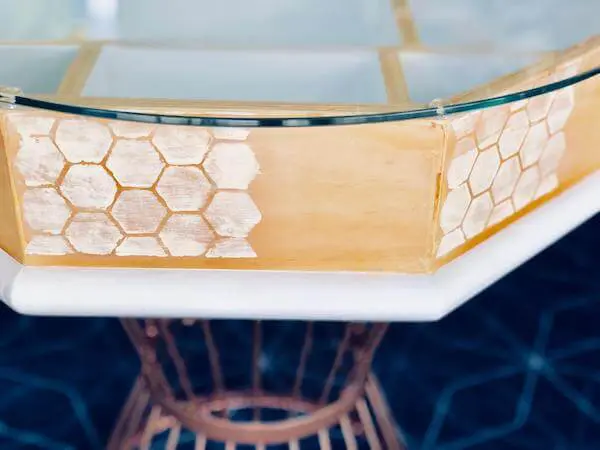
Finished table-geometric “less is more” stencil detail.
Love this table’s rug? It’s called Geometrix Navy by ruggable.
Pin It!
If you like this little gem, pin it to your board…you might just find something like this to makeover some day!