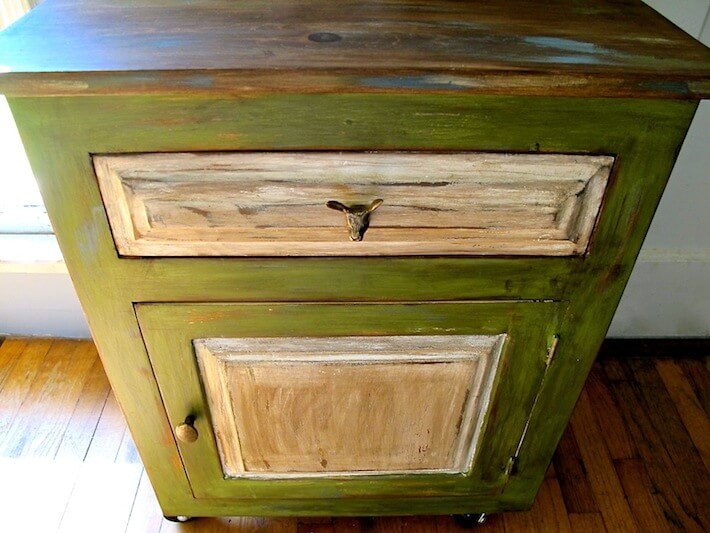

Custom painted and refurbished Cabinet Before & After.
Now that I’ve just about finished redecorating our living room space, plain furniture just doesn’t work in our home anymore. So, while flipping through my monthly Pottery Barn catalog (sorry Phoebe!), I discovered the most beautifully distressed buffet (see image below). It immediately reminded me of my grandmother’s farmhouse, where almost every piece of wood furniture showed years of natural wear and tear. Her home was…(sigh…) wabi-sabi im-perfection.

Pottery Barn’s Ellsworth entertaining buffet. source: potterybarn.com
I was immediately inspired and made a mental note to try and recreate this effect on a hand-me-down cabinet we’ve had standing guard at our front door. It’s been a very useful little piece of furniture and so conveniently offered a clean slate to make-over into something fabulous. I previously experimented on a found (and free!) TV cabinet and had a hand at my first custom refinishing project with “steep learning curve” results. With the naivety boldness of a budding DIYer, I accepted the challenge, then crammed the fear of failure into my back pocket.
Take a look now, at these pretty simple and straightforward instructions and photos (ad nauseam) that illustrate how I guesstimated my way through this project. Oh, and in honor of Grandma Maude, I added custom touches of a critter often found hopping around her garden. Down the rabbit hole we go!
Painted “Rabbit Hole” Cabinet…here’s what you’ll need:

Painted cabinet supplies.
• electric hand sander
• sanding block
sand paper (medium to fine -P80/P120 grade)
• tarp
• stick-on vinyl letters (I used 2″ Helvetica font)
• level
• medium sized paint brushes
• paint (we used different sample shades of blue, green, and cream – BE CREATIVE! Use whatever color that excites you!)
• Phillips screw driver or drill w/screwdriver bit
• exacto knife or razor blade
• 4 casters (I attached 4″ casters)
• hardware – we reused a drawer pull an old cabinet and the bunny knob from Anthropologie)
• Briwax (you can use any color, I used the “original” finish)
• old t-shirt or smooth rag for finishing
• rubber gloves
• optional: painters tape (for final layer of inner panels)
Note: er…um…as you may have noticed, I added some things to this list that’s not shown in the photo above. My apologies to the left-out supplies…I will be sure to give you camera-time on the next project.
Here’s what you do:
Step 1: Remove hardware and begin sanding all surfaces of cabinet.

Sand cabinet.
Step 2: Choose which side you wish your lettering to go, then use a level to apply.
Note: this is all about your home, your personality. Like Madonna so poignantly writes, “Express yourself!”

Use level to stick on letters.
Here’s what it should look like at the stage of the game…

Sanded cabinet.

Sanded cabinet with letters.
Step 3: Start splashing on layers of color.
Note: have fun with this step…you can place your brush strokes where ever you wish. I noticed, later, that the darker shades showed up the most after sanding.

Start splashing on color.

Add different shades of the same color randomly. Note: I only slightly painted the top…my goal was to try and allow its wood grain to be the star after Briwaxing.

Paint on highlight colors.

Be sure to paint over stick on letters.

Have fun with color. This will look really cool later…trust me!
Step 4: Paint the final layer of paint using your desired main color. Be sure to completely cover your lettering.

Paint final layer using your desired main color.
Step 5: Paint second main color on the door and drawer panels. Optional: If you’d like, allow the first main color to dry, then tape off for a crisp and clean finish.
Note: this cabinet was easy to paint by hand…plus, I was able to sand off my “oops!” brush strokes later (distressing is ironically not so when it comes to precision!).

Paint second main color on the inside panels of door and drawer.

Painting final door color.
Step 6: Remove old legs, then set aside for another project. Reuse, baby!

Remove old legs.

Set legs aside for another project.
Step 7: Before paint dries (very important!) remove stick on letters using an exacto knife or razor blade.
Note: with your fingers, press down any lifted edges.

Remove stick on letters with an exacto knife.
Step 8: Begin sanding using your sanding block and medium to light grade sand paper. This is where it’s all about your inner “design force”. Sand to your heart’s desire!
Note: for a natural distressed look, pay special attention to the edges and any areas where normal wear and tear might occur.

Begin sanding using a fine grade sand paper. Klunkers was, as usual, on site to offer his DIY expertise.

Sand so you can see other layers of color. Note: you can also sand the edges of your lettering for a cool, aged look.

Sanding side of cabinet.
Here’s what it should look like after sanding…

Finished sanded cabinet. If you’re digg’n this look…you can paint on a layer of clear finish and be done. I wanted something a bit more industrial…so deeper into the rabbit hole we go…
Step 9: attach casters. Note: this is where your drill will come in handy!

Attach casters.
Step 10: using a cut up t-shirt or soft rag, apply Briwax.
Note: the more you apply, the darker the finish will look. Again, use your inner “design force” and be confident! Oh, and don’t forget your rubber gloves or you’re gonna have very tan fingers!

Apply Briwax.

Stain to desired richness. I was very pleased at the top’s wood grain…it came out better than I thought!
Final step: Add new hardware. Be creative! Look for unique and interesting hardware online, at flea markets, even old furniture to up the interesting-factor of your personalized refurbished cabinet!
Note: I couldn’t WAIT to get to this step! It absolutely pulled all the custom elements together – the paint effect, the lyrics lettering, and the ode to my grandma.

Add new hardware.
And this is what I discovered at the bottom of the rabbit hole…

Finished top of cabinet.
")
Rabbit head drawer pull found at Anthropologie (yippee!)

“I lost my balance and fell into a rabbit hole…”, written by me for the song “Hope Will Bring You Home.”

Lyrics lettering up-close. I had a lot of fun with the placement of my lettering…NO RULES, people!

Custom painted and refurbished cabinet after. I just a-love the casters, too!
What “something special” would you add if you tried this at home? I’d love to hear your ideas!
 This is my FIRST Pinterest Challenge! Whoohoo! So, if you’d like to see lots other fun and clever projects by DIYers like myself, jump on over and visit Megan, Katie, Sherry, and Michelle. Ya gotta love all this link love!

All photography (except otherwise noted) by Skaie Knox, HomeJelly