
Side view of animal toy bowl-tiger.
When it comes to kid knickknacks, there will most likely come a day when they end up in some under-the-bed shoebox or bin, cast aside like Rudolph’s “misfit toys”. No biggie…many of us have done the same thing with our stuff as youngsters.
Good news is, by keeping my ear to the creative crafting tracks, I’ve devised a fun and functional way to upcycle these tiny trinkets. With the help of our friends from HomeRight, I armed myself with their Heat Pro Plus heat gun to turn about 60 or so discarded plastic animal figures into a fabulously whimsical and decorative bowl.

Upcycle unused toys.
Supplies:

Toy bowl supplies.
• 60+ plastic figures (animals, dinosaurs, insects, army men, etc.)
• metal bowl – to shape your bowl
• heat gun – I used HomeRight Heat Pro Plus
• heat tolerant bowl or plate – to set your heat gun on during project
• gloves and eye protectors
Instructions:
1. Place plastic pieces into bowl. Start at the bottom, then mindfully start piecing the toys together like a puzzle. The closer they are placed, the better they will hold once melded together.

Begin by mindfully placing and puzzling together your plastic toy pieces.
2. Slowly begin heating up the toys on low. Start with the low setting on your heat gun and begin gently warming the figures. I actually tested the heat gun on some plastic trees that were mixed in with the animals that became the base of my bowl (which was so fun, by the way!). It’s a good idea to start with some pieces you least like to get a feel for how fast they’ll melt.
See Also: Smart and Effective Everyday Uses for Your Heat Gun

Gently heat the toys on low.
3. Carefully and mindfully melt the pieces together on high. Be careful! Melt the pieces just enough for them to adhere to each other and keep rotating the bowl as you go. If you melt them too much, you’ll lose their detail and charm. If you find that you want to add more animals…go nuts! Just repeat steps 1 -3.
Safety note: The Heat Pro Plus can get as hot as 1000°F on high, so be sure to wear your gloves and eye protection. Additionally, make sure to read the safety instructions of your heat gun before use.

Carefully and mindfully melt toys together with your heat gun on high.
4. After melding pieces together, place in the freezer. Once you’re happy with the shape of your bowl, you need to cool and set it. Place a hot pad in your freezer, then set your bowl on top of it and leave it for about 15-20 minutes.
Note: Before putting your bowl in the freezer, you can press the pieces together to make sure they have bonded. Do this with your gloves on, as the plastic will be hot and possibly a bit sticky.

After melding all the pieces together, place bowl in freezer to cool and set.
5. Remove from freezer and turn bowl upside-down to remove. Be very gentle when removing your new plastic toy bowl so not to break it. Check to see if it is well-bonded and enjoy!
Note: I had a few pieces come loose, so I simply returned the plastic bowl back into the metal one, turned on my heat gun and melted them back together. Voilà

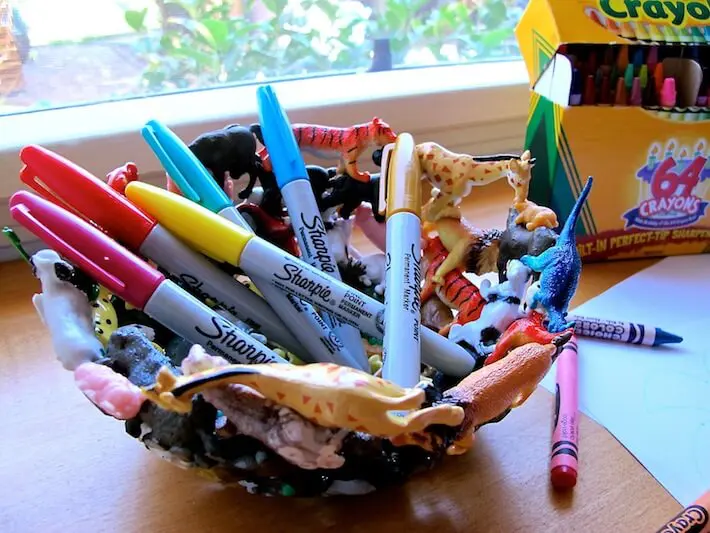
Finished toy bowl!

Great for a kid’s room…

…but, because of its fragility, it might be better as a great way to add a little humor to your bookcase!

Finished bowl side view.

Tipped side view of toy bowl.

Fun and functional toy animal bowl.

Toy bowl center close-up.
Would you try a project like this?
Photography by Skaie Knox, HomeJelly
This is a sponsored post. The opinions are completely my own based on my experience.
Disclosure: We received the product mentioned above (HomeRight’s Heat Pro Plus heat gun) for free, along with a sponsored blog fee to try and mention the sponsor’s item for this blog post. We only recommend products or services we use personally and believe will be beneficial to our readers. We are disclosing this in accordance with the Federal Trade Commission’s 16 CFR, Part 255: “Guides concerning the use of endorsements and testimonials in advertising.