
Industrial-mod refinished cabinet.

Orange, plastic-looking cabinet, before.
I wasn’t very impressed when I laid eyes on the abandoned TV cabinet standing embarrassingly alone in the middle of my brother-in-law’s soon-to-be-new apartment. This orange plastic-looking, pathetic piece of furniture was practically begging me, “God, get me outta here and into some new paint, will ya?!?” I realized after closer inspection that it was actually made of wood, had decent storage capabilities and would make a fun surprise makeover for when Johnnie and his girlfriend, Alexis came back into town to move in. Challenge accepted! I’d been anxious to try this new paint and finish technique, a sort of melding of industrial-style distressing and mod color striping, but I had never attempted the process before. Ah, no worries! The cabinet was free, so why not?
The following tutorial is a sort of “learn from my mistakes” step-by-step, and though I took the long way around, the results (and the lessons) are quite impressive….if I do say so myself.
Here’s what you’ll need:

Cabinet supplies.
- wood cabinet, desk, dresser (whatever you’d like to refurbish)
- hand sander (electric)
- sanding block and/or sponge sanding block
- sand paper (P220-very fine and P60-medium coarse)
- paint remover (I used Jasco Premium Paint & Epoxy Remover)
- flat paint (use any color(s) you wish and if you’d like to distress by sanding, use 2-3 colors)
- Briwax
or polyurethane finish
- scraper
- protective rubber gloves
- painters tape
- pencil
- Yard stick
- a variety of small to medium brushes (one medium for applying the remover, and several sizes for applying paint)
- tin can or ceramic bowl for remover, plastic cups for paint
- drop cloth
- bricks or empty paint cans
- Optional, but HIGHLY recommended: tent or EZ-up tarp to protect you from sun exposure (and keep your furniture piece clear of tree debris!)
- Optional: new hardware for handles
Here’s what you do AND don’t do:
1. Apply paint remover.
- DO wear protective rubber gloves and apply liberal amounts to all surfaces you wish to strip off paint, then wait 15-30 minutes before scraping. Note: if you’d like to hold just a small amount of paint remover, use a tin or ceramic bowl only-this is a harsh chemical, and plastic will be eaten away. Set a drop cloth OUTSIDE or in a well-ventilated area, then place your piece on bricks or paint cans for easy access to bottom edges.
- DON’T apply a thin layer as the remover will not work into the paint enough – you’ll spend way more time sanding long after you’ve scraped. Note: you may need to apply multiple layers of remover for tough-sticking or old paint.

Apply plenty of paint remover.
2. Scrape off paint.
- DO scrape along the lines of the wood grain.
- DON’T be impatient and scrape too deep, as you will end up digging into the wood.

Scrape old paint.
3. Sand excess paint.
- DO use a medium coarse sand paper (P60) and an electric hand sander for major surfaces. For edges use a sanding block or sponge sander. A paint scraper was useful to get into the nooks and crannies.
- DON’T begin until the wood has completely dried, or you may have trouble sanding off the excess.

Electric hand sand the excess paint.

Use an edging sanding block for tough edges.

Get into the nooks and crannies.

Sanded, dry cabinet ready for painting.
4. Optional: Tape off custom stripes and apply first coat of paint.
- DO press down on the edges of the tape to avoid leakage. Use the color you wish to appear the least on your piece.
- DON’T forget to press in your painters tape on detailed edges like the door panels.

Tape off custom stripes and apply first coat.

First coat finished.
5. Apply Briwax.
- DON’T apply any kind of wax to the first layer of paint if you wish to have that color show through after sanding for your final look. Note: The wax sealed the white paint underneath and made it impossible to sand down so that it would peek through…not what I wanted. BIG mistake…don’t do it!

Briwax applied too early…oops!
5. Apply second layer of paint.

Apply second layer and paint color.
6. Optional: measure out your stripes.
- DO use a yard stick. It’s easier to draw the lines if you want to add this custom design. Note: I made some lines thin, others thick and left the outside ones natural wood.
- DON’T try it by hand, unless you want a hand-drawn effect.

Measure out your stripes.
7. Tape off, paint stripes, pull tape off.
- DO take your time to lay painters tape firmly and evenly onto the guide lines. This will insure a more pro looking design. Note: I started by taping off each side of the outside lines, then pulled that tape when I was done. I proceeded to do the same with the inside lines. Then, by the time I was done with those, the outside lines were dry enough to tape over so I could finish painting the lines next to them. This is the part that took the most time…put on some good music and get into the DIY zen of it!
- DON’T wait for paint to dry completely before lifting the tape, The paint may dry and stick onto the tape which might get pull off as well leaving a bit of a chippy mess. Note: I used leftover craft paint from other projects, so some of the paints were semi-gloss. Semi-gloss can get rubbery before it cures, so it’s better to pull off the tape as soon as you’re done painting each line. Also, I NO DOUBT had to touch up my lines (see photo below)…however, because I was planning on sanding them later, it wasn’t necessary, as the desired industrial mod look I was going for was to be imperfect. Admittedly, I still did some touch-ups.

Tape off, and paint stripes.
8. Touch up and reapply paint stripes for deeper color, if necessary.

Touch up and reapply for deeper color.

Finished stripes.
9. Optional: sparsely apply accent color.

Sparsely apply accent color.
10. Apply final layer of paint,
- DO cover and neatly paint entire piece (except custom lines) as this is the final layer.
- DON’T use semi-gloss paint…BIG mistake. Why? Because if you’d like a distressed, industrial-looking finish, you’ll need to sand down through every layer of paint (down to the white/first layer). Semi-gloss, if not cured is very rubbery and will peel and flake like drying Elmer’s glue if you try to sand it. Note: Not realizing semi-gloss was a “no-no”, I kinda had no choice but to proceed. So, I really let the piece dry an extra day, then carefully hand sanded & distressed it very lightly. I still had some areas where the paint, after sanding, started to roll and peel, but after “MacGyvering” it with care, I was quite satisfied with the final result.
- DON’T paint over your custom lines! If you want them to appear bright, don’t paint over them. Note: had I used flat blue paint (on my final layer), I might have been able to sand down to the stripes, but they most likely wouldn’t have come out as vibrant. Letting the cat out of the bag, I had to spend another TWO DAYS remeasuring and repainting my custom lines OVER the final color, because I was not able to sand even one layer for them to show through. It was a happy accident, though, because I learned that to keep colors vibrant, it’s better not to paint over them.

Apply last layer…don’t paint over custom lines. Oops!
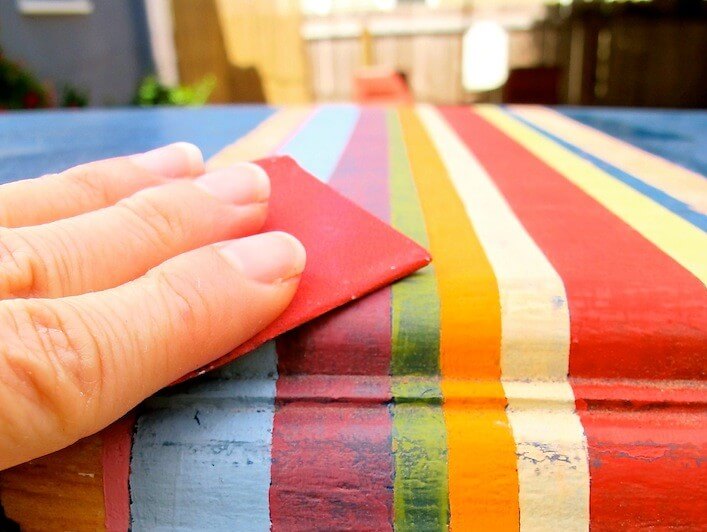
11. Sand overall to desired look.
- DO sand by hand using fine paper (P220) and a sanding block to edges, detail moldings, to the front and top of cabinet. There is no perfect way to distress, as long as you like how it looks. Distressing the stripes adds interest and makes the piece look like it’s been around for years.
- DON’T sand with an electric sander as you will not have as much detailing control.

Sand to desired effect.
12. Finish by rubbing Briwax over entire piece (even the stripes) and attaching new hardware.
- DO use a rag and apply in small circles, then another one to wipe off the excess as you go. You’ll get the hang of it and you can use as much or as little as you wish to achieve a distressed, industrial-mod finish. Note: if you don’t wish to use Briwax, you may want to finish and protect your piece with a layer or two of polyurethane.
- DON’T be too heavy-handed with the Briwax or you might have to remove it using mineral spirits (dampen a white cloth with mineral spirits ((paint thinner))-you may have to do this a couple times) wait for it to dry, sand it off, then go over it again. Go easy at first until you’re confident about the amount you want to apply.
DONE!

Refinished cabinet side view.

Refinished cabinet top view.

Refinished cabinet close up.

Refinished cabinet front close up.

Refinished cabinet and Klunkers.
Hey HomeJellies! What have you refurbished? Tell us about it below and/or send a photo to [email protected] or post to our HomeJelly Facebook page!
Framed artwork by Abril Andrade Griffith. Photography by Skaie Knox, HomeJelly.com.