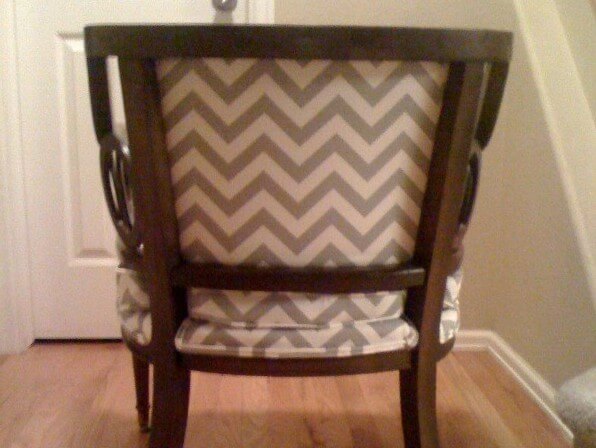

We were delighted to find in our in-box, a recent project completed by home decor DIYer and DiggersList user and friend, Brooke Hughes. Wanting to add a little pizazz to her pad, she found this very stylish, but in-need-of-a-make-over chair on DiggersList posted by the Habitat Re-Store in Fort Collins, CO. Brooke decided to have a go at her very first “reupholster-a-chair venture” and happily took us along for the ride!
Items you’ll need:
· Awesome chair from DiggersList
· Fabric (ordered 4 yards online from a baby bedding store)
· Foam padding (optional if the original padding will work)
· Double welted cord (used 8 yards)
· Sewing machine
· Staple gun
· Hot glue gun
· Fabric glue (optional)
How-to instructions:
- Strip down the chair taking off all the previous fabric and padding. This entails hundreds of staples, so use needle nose pliers and take them all out one by one. Note:I took lots of photos of how the original fabric was laid out to help me as a guide for when I started to rebuild using my new fabric and padding.

Strip down to the frame. If padding is still in good shape, go ahead and reuse it!
- Sand the frame and paint. Note: I loved the look of the original distressed wood, so all I ended up doing was cleaning the frame and using some wood repair markers to fill in any dings.
- Start with the back panel (back of chair), using a simple fabric square, and attach with fabric glue to hold it in place. Finally, use the staple gun to staple it all in place. Note: you can also use some “nifty holders” (clamps). I found these in my husband’s tool box.

Use simple fabric shapes, helpful clamps and household glue and scissors to easily complete this project.
- Cut the fabric for the front of the back panel of the chair (using the old fabric as a template), then cut some foam padding to the size of the fabric and attached both the front piece and the foam in with more staples. Note: I did the same with the bottom, stapling in the fabric to cover the springs (the original fabric for the bottom of the springs was still okay to keep).
- Next, start on the cushion. This part takes lots of patience. Used the original cushion as a template (and, if you’d like, make any adjustments if you want it to be a bit bigger and more firm). Then, (a.) cut the size you want in the foam padding (I went 1 inch thick) and cut the fabric around the foam. (b.) Once you have those templates, set them aside to create the cording by (c.) sewing the fabric diagonally over the cord. (d.) Then, cut the middle sections, using the foam as a template and sew the top panel, the cord, the middle section, and then the bottom cushion template all together leaving a part in the back to insert the foam. (e.) Once the foam is in, sew it shut by hand.
- After all the fabric is placed on the chair, make the double welted cord. Simply cut the fabric diagonally, insert the cord and sew it shut, flip over and add in another cord and sew in the middle.

Cording can be a bit intimidating, but it’s totally doable and creates a much more finished and elegant look.
- Once all the double welted cording is done, use your handy hot glue gun and glue it to the chair covering the areas where you use the staple gun to attach all the fabric. This part is super easy…there are many reviews stating that hot glue is the way to go. Done!

From DiggersList to your home. Giving history a future.
All in all, this project was pretty inexpensive. I bought the second hand chair from DiggersList, researched fabric that was the most inexpensive for the style I was looking for, used tons of weekly coupons for JoAnn Fabrics for the padding, welted cord and fabric glue, stole the staple gun from my husband’s tool chest and everything else I had at the house, including fabric scissors, measuring tape, thread, etc.

DiggersList is fabulous!!!
DIY project and photos: Brooke Hughes, DIY and DiggersList fan making an attempt at her very first reupholster job.