
Before and after brick paved patio.
When we first moved into our rental, one of its selling points (or, rather renting points) was the backyard square footage. Typically, homes in the “Tree Section” of Manhattan Beach, are built out to the edges of the property footprint, leaving only tiny strips of green space (if you’re lucky) and very little motivation to enjoy the outdoors. Our yard size, in comparison, is likened to that of a small park. Though it was a mess when we first moved in, we knew there was potential.
After a whole lot of gardening, laying down new sod and convincing our landlord to replace our archaically decrepit (and dangerous) garage door, we had one more area to tackle: our dirt pathway. Originally, we wanted to create a simple paved walkway maybe two feet wide; enough to make our way from the patio against the house to the grassy backyard and garage back door. Those plans completely changed after we found a goldmine of clay bricks through HomeJelly’s sister site, DiggersList. For just pennies on the dollar, we were able to score a truck load, thus allowing us to expand our path to a whole new outdoor space. Here’s the amazing thing: no cement was used, making this a non-permanent brick patio makeover. So, for those of you who rent, or if you just want to inexpensively and non-committedly install a brick path, patio or landing, this project is for you. See now, how Matt paves the way.

Fountain and supplies.
Here’s what you’ll need:
- bricks (we used approximately 600 for our project)
- wheel barrel or sturdy wagon
- hoe
- rake
- shovel
- hand fork
- rubber mallet
- hammer or metal mallet
- steel wedge or crow bar (we also used one side of a pruning shear blade)
- level
- broom
- safety glasses
Here’s what you do:

Measure your space.
1. Measure your space: looking at the photo above, one brick is typically 8 inches long. If you put two bricks together, side by side, their widths also equal 8″. When placing the brick pavers down, Matt alternated two at a time, two one direction, then two the other direction (perpendicular). We wanted to know approximately how many bricks we would need, so, using the numbers above, we roughly figured it would take four bricks per square foot. Somehow, this semi-imperfect method of measuring worked.

Prepping the path.
2. Prep the path/patio area: using a hoe, dig into the area you wish to pave. Matt found all kinds of roots, large rocks, and yard debris collected since 1932. After digging, rake the surface as level as you can to ready the space for paving.

Paving the pathway.
3. Pave the pathway: part of this type of paving method’s charm is its imperfection. Professional patio contractors may cringe at the thought, but the point of this how-to is to “get ‘er done!” In other words, don’t sweat the small details, just flatten the dirt as you go, and use a level from time to time to make sure it’s actually even. If a brick sticks up on one edge, take it up using a hand fork, dig it out a bit, then replace the brick so that it’s even with the one next to it. Again, a little unevenness gives it its charm…no worries!

Tapping the pavers.
4. Tap the pavers: as you lay down each brick, be sure to use your rubber mallet to tap them together. This will insure your path or patio to stay in place and prevent wide cracks between the bricks. Note: if you use your metal mallet, you may end up chipping your bricks.

Brick pathway section, laid out and almost done.

Klunkers is pleased so far…
Our pathway section was laid out and just about done, but we still had a ton of bricks. On to the half-circle patio addition!

Leveling out the frame for rounded section.
5. Level out the frame for the rounded section: here, Matt frames out the semi-circle and starts by placing a level on a piece of wood that evenly bridges the pathway bricks to the new ones that will make up the semi-circle shaped patio.

Filling in the cracks and spaces with fill dirt.
6. Fill in the cracks and spaces with fill dirt: to firm up the bricks you’ve already laid down, shovel fill dirt on top, then use your broom to make sure the dirt gets into all the cracks and spaces. You may have to shovel quite a bit of dirt onto the bricks so that all the spaces are filled.

Paving to the edges.
7. Pave to the edges: next, you can now finish laying down your bricks for the semi-circle section all the way to the edge of the frame.

Shaping the bricks.
8. Shape the bricks: you’ll notice in step 6’s photo that there are now triangles of holes left after paving up to the edge of the frame. A regular brick will not fit, so you’ll have to shape them to size. Simply lay a brick over the triangle hole and mark approximately the shape you’ll need to break off using a pencil. Then, with safety glasses on, place a wedge or (pictured here) the edge of a crow bar or blade of a pruning shear onto the pencil line, and firmly hit the back of it with a hammer or metal mallet. It should crack right off! Try it!

Klunkers is always on the job!

Filling the cracks and spaces again.
9. Finish by filling the remaining cracks and spaces: once all the brick has been laid, finish the patio by throwing on and brushing around more fill dirt. To really make the bricks firm, take your hose and water everything down, throw more dirt and brush it in, then repeat one more time. You may find that after a week or two, the dirt between the bricks may have settled even more. In that case, throw another pile of dirt to fill all the cracks one more time. You are now done!

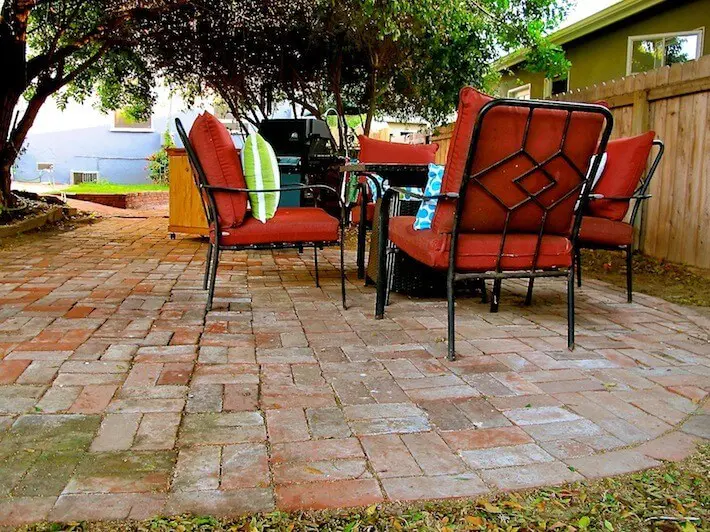
Patio dressed and ready for company!
The patio adds wonderfully useful outdoor square footage, and here we’ve dressed it with comfortable furniture, colorful handmade throw pillows made from beach towels, and a propane fire pit. “Matt, time to BBQ the salmon!”

Ready to toast our new functional patio.

Rounded patio ready for lounging.
What do you think about our non-permanent brick patio?
Photography by Skaie Knox, HomeJelly.com