

Table Makeover Before & After.
With Thanksgiving just around the corner, I was really wanting a new kitchen table but I knew it wasn’t in the budget. So I was left with two choices: paint it or stain it (oh, and leaving it as is was not an option for me because my mind was set on changing that table).
I have painted a lot of furniture in my time, but I have never stripped and stained anything (yikes!). I really wanted the table to have a dark, rich, barnwood look, so staining it was. I decided though that I would only stain the top and leave the legs as is. I can tell you that painting furniture is much easier; however, I am really happy with the results and I feel like I have a brand new table. Check it out…
Table Makeover…Here’s what you’ll need:
- Citri-Strip Paint and Varnish Stripping Gel
* (see notes in step 1)
- paint brushes
- steel putty knife/scraper
- Premium Paint & Epoxy Remover
- electric sander (we recommend the SKIL Palm Sander With Pressure Control And Micro Filtration
because of its good price and excellent reviews) - medium and fine grade sandpaper (P60, P120 respectively)
- Varathane Wood Stain, American Walnut
- staining pads or rags for staining
- Varathane Interior Crystal Clear Poleurethane, Satin Finish
Here’s what you do:
Step 1. I had to strip the white paint, so I started off by using Citristrip Stripping Gel* (I chose Citristrip because it was low odor). It goes on orange and slowly peels the paint off. Then you use a wood scraper to scrape it off. The Citristrip was taking a little too long for my impatience, and it was not quite pulling all of the paint off. So I switched to Jasco Premium Paint & Epoxy Remover and a metal scraper. Smart move on my part. It removed the paint so much quicker and more thoroughly.

Stripping off paint with Citristrip.

Citristrip stripping gel.

Fnishing the stripping job with Jasco Premium Paint & Epoxy Remover.

Jasco Premium Paint & Epoxy Remover.
Step 2. Once all of the paint was scraped off, I used my electric sander and sanded down the entire surface until it was really smooth.

Sanding down the entire surface of the table.
Step 3. Next came the staining. I used Varathane Wood Stain in the American Walnut color. I applied the stain with small staining pads and rubbed it into the wood. I applied two solid coats because I really wanted to make sure it would absorb into the wood and stay dark. I was really loving what I saw.

Staining the wood with Varathane wood stain.

Varathane Wood Stain, American Walnut and staining pad.
Step 4. Finally, I used Varathane’s clear Polyurethane in a satin finish to seal it. Two light coats was all it needed to give the tabletop a smooth and protected finish.

Finished off table with Varathane’s Clear Polyurethane, satin.
Step 5. I let the table sit for 24 hours before bringing it back into the house and using it. In the end, it didn’t take long, nor did it cost much and I was thrilled with the results and got the exact look that I wanted.

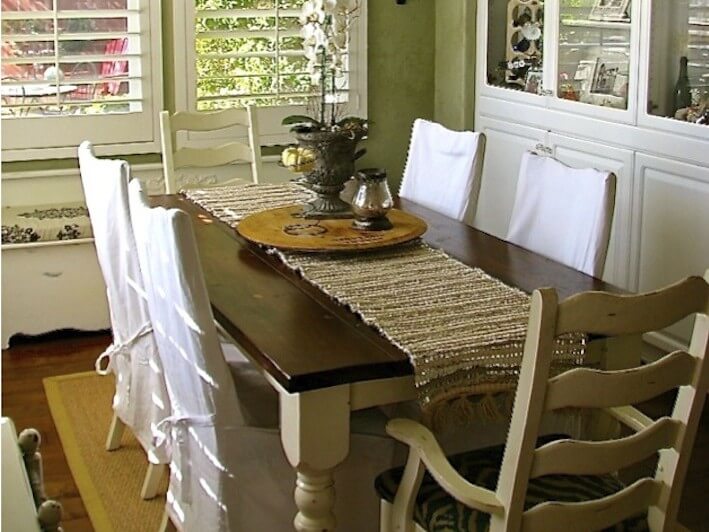
Table makeover after!
Here, I’ve dressed my “new” table with just a simple woven runner and lazy Susan centerpiece, my flea market find, a repurposed oil drum chandelier, peers down in approval. Now my dining room is ready for company and for any special occasion…Thanksgiving and Christmas? Bring ’em on!
Update: See how I created this rustic and romantic Thanksgiving tablescape that dressed up my “new” table!
Would you try this DIY project on your dining table? Would you makeover just the top or the whole thing?
Photography by Bridget Johnson, HomeJelly