
Reclaimed custom console table. Check!
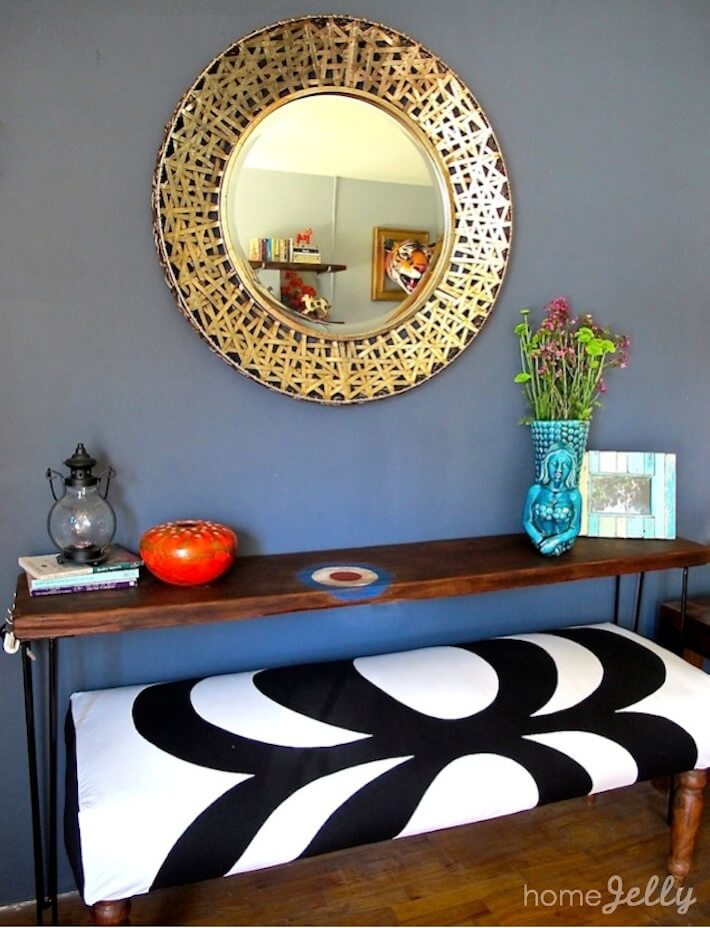
Along with certain design challenges, the DIY to-do list can get pretty long when living in a 1930s, tiny beach bungalow. A clear example in our home is that architecturally, there is no formal welcoming area. It’s pretty much a door that opens to a square room and nowhere to hang your hat…until now! As part of my “Living Room Makeover” series, I’d like to introduce you to our new entryway…ta-da!

Entryway before and after.
Aside from the occasional shoe clutter, this “hello!” section of our home is now organized, neat, and features one of my most prized creations: a reclaimed customized console table. The cost? Just right around $80-not bad for a 5′ 1″ x 11″ table.
See Also: Funky Furniture Can Be So Fine
The wood was reclaimed from shelving out of our garage (I’m estimating it was originally built in the mid-part of this past century), and because I had all the other supplies and tools, the cost was kept relatively low. Is it okay if I beam a little bit with pride? Oh, and I have also conquered a bucket-list item: to make my own, specially designed piece of furniture. Check!

Mod target design detail and Klunkers…who is definitely intrigued.
Now it’s your turn! It was seriously SO easy…even a self-taught DIYer (like me!) can do it! On we go!
P.S. More later on the entryway details…stay tuned!
Reclaimed Custom Console Table…Here’s what you’ll need:

Reclaimed custom console table supplies.
• 1 1/2″ thick by 11″ to 12″ wide piece of wood (preferably reclaimed to add character and the “green” factor!) Note: to locate locally reclaimed wood, check out woodfinder.com.
• pencil
• tape measure and straight edge (i.e. ruler)
• circular saw (or, if you don’t like to use power tools, you can certainly use a hand saw-be prepared for a good cardio workout!)
• electric hand sander and sanding block
• medium and fine grade paper (P60 or P80 and P180 or P220, respectively)
• Optional: printer, paper and scissors
• Optional: small paint brushes and paint
• Briwax (I used the original stain)
• soft cloth
• four (4) 28″ hairpin legs
• 2″ screws
• drill
• Optional: 2-4 older keys (new keys are too brittle to bend-I found mine at an antique’s flea market)
• Optional: 2 sets of pliers (I would have used a needle nose pliers, but alas, I need to purchase one!)
• Optional: 1″ screws
Here’s what you do:
Step 1: Wipe off your reclaimed wood piece and place it onto two saw horses or a solid surface for cutting.

Reclaimed wood piece.

Old and beautiful wood.
Step 2: Measure how long you want your table, mark desired length, then with your pencil, mark your cut line. Note: remember…this is YOUR table…so make it as long or short as you wish! Nice!

Measure how long you want your table.

Mark desired length.

Mark cut line.
Step 3: Using your circular saw, begin by cutting a small notch to make sure you are using the right guide line. Cut along your pencil marked guide line.

Using your circular saw, begin cut by making small notch.

Using the saw guide, cut along your marked line. Thanks Matty! Go Kings!
Step 4: Electric hand sand all surfaces until butter smooth, paying close attention to the edges. Note: I decided to round them out a bit for an overall smoother look and feel. After all…who doesn’t love butter?

Hand sand all surfaces until butter smooth.

Sand surfaces paying special attention to edges.
Step 5: Optional: print and cut out your custom design to paint onto your wood…come on! Have fun! You can use shapes, floral or abstract designs or lettering…the options are endless! Note: I printed out three versions of my target and cut out the center, middle, then outer rings. I then traced them separately, then painted them in…fun!

Print, then cut out design template.

Place and trace your template. Note: I wanted it to be a little quirky, so I had the design spill over the side and placed it off center. I love things that are off center…it’s a bit more unexpected.

Tracing the center of the template…almost ready to paint!

Carefully paint your design. Note: if you decide to distress by sanding your design, you won’t have to worry about perfection…besides, perfection is not always perfection. (You can quote me on that!)

Painting the outside of the target.
Step 6: Once the paint has dried, use your fine sand paper and sanding block to slightly distress your design. Note: be sure to pay particular attention to the edges of your design-it looks a bit more authentic if they get slightly sanded off for some reason.

Once dry, sand design for distressed look.
Step 7: Wipe on your Briwax and cover your design as well as all surfaces of your table. Note: this is where more customization comes in…make your table as dark or light as you desire!

Cover design with Briwax.

Wipe Briwax onto all surfaces.
Step 8: Attach your hairpin legs. Note: be mindful of the edges of your wood piece. Ours had some nails still embedded in them, so we had to be careful about not screwing them in those places, risking splitting the wood. In fact, we ended up screwing in just a few screws on a couple of the legs for that reason.

Klunkers ready to watch me screw on 28″ hairpin legs

Attach hairpin legs. Easy-peasy!!!
Step 9: Optional: Bend key hooks using two pairs of pliers. Hold the top of the key with one pair of pliers, then grab the bottom part of the key to bend with a second pair (preferably needle nose for a tighter bend) and slowly bend the key into a hook. Note: this is a fun way to add further customization of your console table-add hooks for keys or scarves or whatever you wish.

Using a couple pliers, carefully bend end of key.
Step 10: Measure where you’d like to place your key hooks, then screw them onto your console table. Note: you can chose to place these wherever you wish! Our keys are now safely hidden from any prying eyes through our giant front window.

Measure where you’d like your keys to go, then screw in key hooks.

Key hooks for your keys.

No more misplaced keys!
The final results…

Side view of reclaimed customized console table.

Unique and personalized design. Your spaces should reflect who YOU are…I am a huge mod music fan and always will be…love.

Overhead view of the reclaimed custom console table. I’m already finding that almost on a weekly basis, I’m changing the accessories on this table. It just calls to be entertained with different decor delightfuls!

Would you try a project like this? What custom design details would you add?
All photography by Skaie Knox, HomeJelly