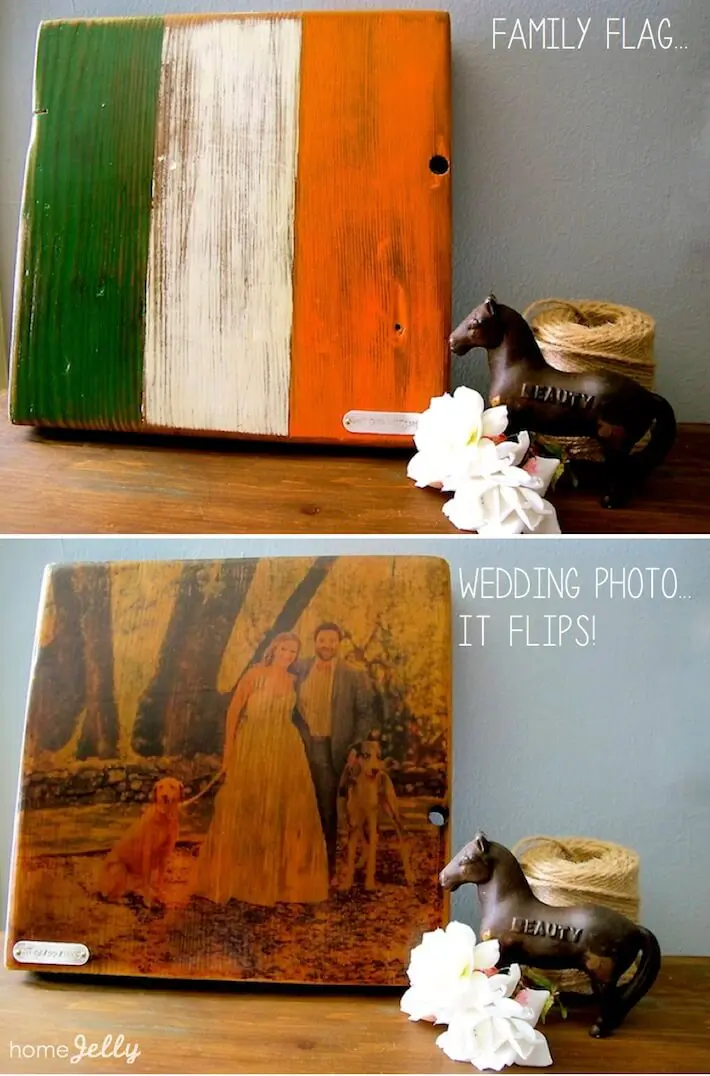

Finished family flag with a surprise on the flip-side!
Whenever a family member gets married, there’s something that compels me to drift off their registry and onto a more self-expressive path. This summer, my cousin Sean wed his sister’s life-long friend, Paige in a most memorable and beautiful ceremony. Impressively unfolding under the Santa Rosa summer sky, the procession of gorgeously clad young people literally married perfectly with the surrounding and picturesque wine and equestrian grounds. It was a photographer’s dream…evidenced by picture after picture that could have easily landed between the pages of Vogue’s Wedding Guide.
So, with a handful of fabulous photos to choose from and a strong tie to their Irish heritage, I knew how I would gift the happy couple: create a flippable wedding keepsake out of reclaimed wood. On one side I painted their family’s country flag of heritage, the other side features one of their favorite wedding photos. It will be their matrimonial lucky charm!
Supplies:

Project supplies
• wood piece (ours was reclaimed CA wood from our 1930s garage shelving)
• pencil and ruler
• craft paint
• paint dish
• brushes (medium sized and foam for gel medium and poly urethane application)
• sand paper and sanding block
• laser printer (or you can go to your local Staples or Office Depot to make a laser print)
• scissors
• credit card or plastic spackle knife
• poly urethane (optional: mod podge)
• Optional: metal stamping kit
• Optional: metal labels
• Optional: hammer, nails and drill
Instructions:
Step: #1: Sand wood piece and then mark off flag design. No need to be perfect, as you will be painting and distressing this side. Note: if your flag design is more complicated, print it out (in the landscape format) on paper, smear the back of it with chalk, then trace the details onto your wood piece. Yeah ya do!

Mark off flag pattern.
Step #2: Paint the colors of your flag design onto the front. Again, no need to be perfect…have fun!

Paint the colors on the front…

And also paint each for edges.
Step #3: Lightly sand the painted side to distress.

Lightly sand to distress.
Step #4: Cut out your laser printed photo to the size of your wood piece.
Note: err on the side of smaller. It’s better that you see some wood on the edges as opposed to having to glue the paper over the edges which could end up looking messy.

Cut out your laser printed photo to the size of your wood piece.
Step #5: Apply a good layer of gel medium. Use your foam brush and make sure it is even over the surface.

Apply one good layer of gloss gel medium.
Step #6: Place the photo FACE DOWN onto your gel-covered wood piece and press until smooth, then let dry 8 hours or overnight. Use your credit card or spackle to press out any air bubbles. Note: be careful to place it where you want it the first time, as the gel medium is uber sticky.

Use a credit card or plastic flat edge to press out any air bubbles then let dry at least 8 hours or overnight.
Step #7: Dab over your dried photo with a damp rag until entire page is wet. You’ll see image coming through as you go. Let sit for about 5-6 minutes.

Go over dried photo with a damp rag and let sit for about 5-6 mins.
Step #8: Carefully start rubbing and removing the paper fibers with your fingers. The backing of the photo will start peeling off leaving the print image on the wood, as shown below, but you can always add more dampness if the paper is being stubborn and not coming off…be patient!
Note: this will take a bit to complete…put on your ear buds and listen to a book on tape, some good tunes, or use this time to meditate. Ohhhmmmm…

Carefully start removing the paper from the photo image using your fingers.

You’ll need to keep working at removing all the paper and the leftover gel. Your fingers may get tired, so you can, at this point, start using a dry rag to carefully rub away the remaining material.
Step #9: Once dry, brush on poly urethane to all surfaces. I used three coats on each side and edges. I simply placed the piece onto four mini plastic cups, brushed that surface, let it dry for about an hour or so, then flipped it and covered the other side and edges.
Note: the more poly you apply, the more smooth and luxurious your piece! Oo-la-la!

Once dry, brush on poly urethane to all surfaces.
Optional: If you’d like to add a little extra “bling” to your piece, include a metal label for their family name and wedding date!
Optional Step #1: Using a metal stamping kit, hammer out the new couple’s last name and wedding date.
Note: I practiced on one of my spare metal labels until I was comfortable. No worries…it’s not rocket science!

Want to add something extra special? Use a metal stamping kit to add a personal touch!
Optional Step #2: Pre-drill holes into the metal label.

Pre-drill holes into the metal labels
Optional Step #3: For instant distressing, lightly sand the metal piece for a brushed steel look. You can also paint and sand it or leave it as is.

For instant distressing, lightly sand the metal for a brushed steel look.
Optional Step #4: Hammer the labels in place. Done! Note: I thought the gold nails added another color dimension. Yum.

Hammer labels onto your wood piece.
Here is my cousin Sean and Paige’s wedding keepsake…!

The Sullivan’s Irish flag.

The Sullivan’s label.

The Sullivan’s family wedding keepsake!

A day to remember.

Finished family flag.

Finished wedding keepsake…it flips!

Every surface is complete.
All photography by Skaie Knox (except for the wedding photo), HomeJelly